The Windows Club Zero discusses & offers Windows XP | Vista | 7 | 8 | 10 Tips, Tricks, Help, Support, Tutorials, News, Freeware Downloads, Features & more.
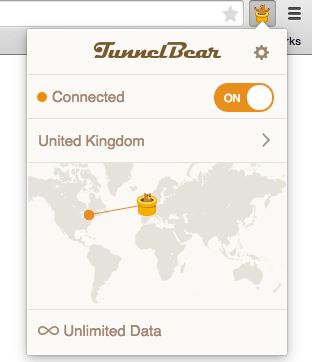
TunnelBear is one of the most loved VPN (Virtual Proxy Network)
services because of its simplicity and clean interface. Now, the company
has decided to make this service even handier by launching an extension
for your Google Chrome browser. So, now you can maintain your privacy
more easily.
Keeping aside the advantages of the anonymity, VPN services are of
interest to those who are in the countries where some services like
Spotify, Netflix aren’t available or some of the services are blocked.
After installing the extension, the free users will get 750MB, but
TechCrunch writes that TunnelBear will soon offer 1GB.
Currently, this VPN extension is available only for Google Chrome.
TunnelBear plans to release the extension for other browsers including
Safari, Firefox and more.
In an interview with TechCrunch,
TunnelBear co-founder Ryan Dochuk said: “Our goal is to make [using a
VPN] as easy and accessible as possible. The extension is so fast and so
easy that you should be using it in your everyday internet activity.”
This TunnelBear extension for Chrome isn’t a full-fledged VPN. It
doesn’t handle data only from your browser instead of your entire
system. So, for browsing purposes and watching Netflix in the
unsupported countries, it is a good option.
TunnelBear, based in Toronto, was founded in 2011 and provides its service to 5 million people all over the world.
Here are some of the services provided by the TunnelBear extension for Chrome:
Stop web sites and advertisers from tracking you.
While using public WiFi, secure your browser’s identity.
Free data every month.
Take the advantage of a fast VPN private network with connections to 14 countries.
I’ve installed and used the TunnelBear extension for Chrome and it
does what it needs to do. It should be noted that it uses the AES
128-bit encryption instead of the better AES-256 encryption used by the
usual TunnelBear app.
Ladies and Gentlemen, we are proudly to present you a gift from our team.
We will give a FREE* software giveaway, licensed and fully functional.
A. DVD to DVD
1. 8 DVD to DVD copy modes available: Full Disc, Main Movie, Split, Customize, Customize Split, Clone, Merge and Write Data.
2. Full Disc: All movies, menus and trailers, is copied to a DVD with just one click.
3. Main Movie: Just copy the movie, with specific audio/subpicture.
4. Split: Copy a DVD-9 onto two DVD-5 discs with 100% quality, and
preserve original menus on both discs. Ideal for episodic/season DVD
movies, TV series, etc.
5. Customize: Personalize your DVDs! Want to make a DVD with only
your favorite titles? How about cutting out those annoying commercials?
Or selecting specific audio/subpicture? No problem! You can select just
your favorite titles, specify the title playback order, with or without
original menus, to create a DVD with only the stuff you want!
6. Customize Split: Copy a DVD-9 onto two DVD-5 discs using "Customize" way. Ideal for episode/season DVD.
7. Clone: Make perfect 1:1 bit-to-bit copy of DVDs:
* Make perfect dual layer DVD copy by using the original layer break position.
* Copy data DVD disc, like PS2 DVD.
8. Merge: Combine several titles of several sources into one DVD:
* Combine two DVD-9 like "The Lord of the Rings" into one DVD-9.
* Merge season DVDs to fewer discs.
* Create your own special features collection disc.
9. Write Data: Burn existing DVD folder or ISO image file to DVD writer, or convert DVD folder to ISO image file.
10. Burn to any blank DVD Disc (DVD+R/RW, DVD-R/RW, DVD+R DL, DVD-R DL).
11. Constantly updated to support latest DVD burners and blank DVD discs.
A. Blu-ray to Blu-ray
1. 4 Blu-ray to Blu-ray copy modes available: Full Disc, Main Movie, Clone and Write Data.
2. Full Disc: All movies, menus and trailers, is copied to a Blu-ray with just one click.
3. Main Movie: Just copy the movie, with specific audio/subpicture.
4. Clone: Make perfect 1:1 bit-to-bit copy of Blu-ray.
5. Write Data: Burn existing Blu-ray folder or ISO image file to Blu-ray writer, or convert Blu-ray folder to ISO image file.
6. Compress BD-50 to BD-25/BD-9/BD-5. (coming soon)
7. Very fast copying speed.
8. Burn to any blank Blu-ray Disc (BD-R 25, BD-RE 25, BD-R 50, BD-RE 50).
9. Constantly updated to support latest Blu-ray burners and blank Blu-ray discs.
Acronyms / Also Known As: DVDFab,
BluFab, DVDFab DVD Copy, DVDFab Blu-ray Copy, DVDFab Video Converter,
DVDFab DVD Ripper, DVDFab Blu-ray Ripper, DVDFab DVD to Mobile, DVDFab
Blu-ray to Mobile, DVDFab DVD Ripper, DVDFab Blu-ray 3D Ripper, DVDFab
Blu-ray to DVD Converter
* - You must complete a simple offer to download the file. In this way we prevent leechers and spam/bots. Offers are easy to complete and it will cost you about 2 minutes!
Tencent PC Manager is a new free antivirus software for Windows
that claims to have the largest security cloud base, the best
anti-virus engine and seven international authoritative certification.
It offers strong protection from computer viruses, spyware, malware,
rootkits, and other emerging threats. The application detects and fixes
safety as well as performance issues encountered on your Windows PC. Let
us review it and have a look at some of its features.
Tencent PC Manager
Tencent,
in case you did not know, is China’s largest and most used Internet
service portal and the fifth-largest Internet company in the world after
Google, Amazon, Alibaba, and Ebay.
Tencent PC Manager makes use of the following to detect malware on your Windows computer:
Tencent cloud
Tencent Antivirus engine
Avira antivirus engine
Tencent system repair engine
A nifty feature of Tencent PC Manager
is that it constantly keeps a hawk eye on your computer and as soon as
you download a file off the Internet, it thoroughly examines its
contents, just to notify you if any suspicious component is detected.
The
application promises a faster scan using fewer system resources, and
real-time protection by instantly identifying and blocking new threats
as soon as they appear. In addition to above, PC Manager includes
anti-phishing, link scanner, secure browsing, webcam protection, USB
protection, and hacking detection protection modules.
Apart from
Quick Scanning, the Custom analysis lets you check the drives and
folders you are interested in, as well as the PC areas that are usually
most vulnerable: system memory, system and Internet Explorer settings,
startup apps, frequently used programs or hijacked system software.
The settings menu houses the following tabs,
General Settings – Lets you enable self-defense to avoid Trojan attacks.
Antivirus settings – Allows you to add programs to the White-list that can be ignored from scanning when the PC Manager starts.
Real-Time Protection – Allows you to take action on threat detection.
Download Protection – Flashes security prompt on dangerous files.
The
only disappointment you come across while using the application, there
is no scheduled scan so you need to do it manually. Apart from this,
Tencent PC Manager integrates well in the context menu of Windows
Explorer and lets you effortlessly scan whatever file or folder you
select.
Visit its home page if you want to read more about it and download it.
Tencent
is China’s largest and most used Internet service portal and the
fifth-largest Internet company in the world after Google, Amazon,
Alibaba, and Ebay. Microsoft also recently announced a strategic
partnership with Tencent. If your Chrome gives you a warning, it could
be a false positive.
Toolbars which are foisted on your computer as bundled software,
usually affect the performance your PC. These toolbars, add-ons, and
plug-ins which land silently on our PCs while installing the third party
freeware, may even compromise the security of your computer, clutter
the screen space of your browser and make it load slowly. The may even
make some changes in settings, which could be difficult to revert. They
could show pop-ups and even leak your personal data. If you are fed up
of such annoying and nasty toolbars and their intrusive pop-ups, Toolbar Cleaner is a free tool that can help you remove all those unwanted toolbars, add-ons and plug-ins.
Soft4Boost Toolbar Cleaner
While you can manually uninstall toolbars using the Control Panel, toolbar cleaner and remover tools like this one makes things easier and ensures a complete uninstall.
Soft4Boost
Toolbar Cleaner is a free toolbar uninstaller software, which removes
all unwanted toolbars, addons, plugins from your Windows PC in real
time, for any browser.
It is a simple program which takes just a
few minutes to download and install in your computer system. Even a
layman can install and run it to remove the tenacious toolbars, add-ons
and plug-ins from your PC.
Remove unwanted browser toolbars, addons, plugins
You need to close all your running browsers to make this program start working. Once you have closed them, and created a system restore point, run the tool. The main overview of the program says all.
Click on the Refresh
button, and the toolbar cleaner then automatically identifies all the
toolbars, addons, browser extensions and plugins along with their path
and brings you the entire list in real time. You can then select and
remove them manually from your PC. It allows you to remove one or more
items at one go.
Toolbar Cleaner will display a list of all – with
pre-checked boxes, so do not click on Remove blindly. Go through the
list and uncheck those which you know are safe and useful to you. Keep
only the one’s you want to remove, checked. Once you have done this, you
may click on the Remove button. This make the whole removal process quite easy as you can remove multiple browser extensions in a click.
The View
tab allows you to change the skin of the program. There are 11
different skins available to switch upon – AMPix, iTunes, Android,
Bionix, GPX, iPhone, Metal, MSOffice 2010, Ubuntu, VIPZone, and Xfactor.
If you don’t want to remove any of the toolbars or plugins from your system, you can add them to the Ignore list
and refresh the list. The Ignore list already includes My Toolbar, and
Soft$Boost Toolbar. You may want to remove them from this list.
You can also send an email to the support team directly from the ‘Email us’ tab in the About section.
You can download Soft4Boost Toolbar Cleaner here
and remove the disturbing toolbars and add-ons. WOT ranks the website
poorly, but I did not face any issues while downloading and installing
the tool. The program is ad-supported and it displays a static ad in the
header.
As computer users, we often spend hours in the late night working.
One difficulty that is encountered in the task is staring into a vision
brighter than the brightness to which our eyes are adapted. Windows includes the Adaptive Brightness
feature, where the OS checks the lighting conditions of your computer’s
surroundings and adjusts the brightness and contrast level
automatically. But this may not always work the way you want it to, and
that is where using a free software to reduce glare can help you. Today, we will take a look at SunsetScreen.
Computer screen glare reduction freeware
Skytopia has come up with a nifty application SunsetScreen,
a free tool for Windows that helps automatically reduce the enhanced
glare on your computer screen at night. The rationale behind developing
this freeware is the scientific research that indicates over-bright
screens can affect the production of melatonin – the chemical which
helps control sleep and wake cycles.
SunsetScreen
dims the screen to match the color of the indoor lightning which in
turn may reduce the effect that over-bright screens have on the
production of melatonin thereby, helping you get a sound and restful
sleep. It is advisable to have a screen that matches your current
lighting conditions to make your computer more comfortable for use.
isn’t it?
With SunsetScreen, it’s easy to dim our screens to an
orange-ey hue to match the colour of the indoor lighting we use. The
application gives you good control over the color adjusting process and
is much more configurable in nature.
It has a system tray icon,
but there’s no right-click menu to configure its functions: you can only
close the program or show its main window. Although, above description
hints less automation, the app gives you more control to adjust the
cycle based on your needs. You can modify the transition phase (set to
60 minutes by default). In this phase, the program handily switches from
day color to night color mode.
SunsetScreen is similar to F.Lux
application for Windows PC which also helps users adjust to the monitor
brightness better. The application is compatible with all recent
versions of Windows (including Windows 8).
SunsetScreen for Windows free download
Interested
users, try this application and make your computer more usable at
night. It requires Microsoft .NET Framework 3.5. You can download the
latest version of the software from here.
There is also a portable version available.
If you give it a try, do let us know in the comments section below how it works for you.
Many people ask – How do I find out how much RAM is installed on my
computer? How much memory does my Graphics card have? How much Video
memory does my Windows PC have?
In this post we will see how to find out
the answers to these questions.
How much Computer RAM does my PC have?
In
Windows 8, you will have to open the Win+X menu > Control Panel >
System. Under the System section, you will see Installed memory (RAM).
This is the Computer RAM which has been installed on your Windows PC.
However Windows may show less RAM than what is installed.
For
instance on some systems, Windows 32-bit, may report that there is only
3.5 GB of usable system memory when 4 GB of memory has been installed.
Or, a Windows 64-bit computer may show only 7.1 GB of usable system
memory when 8 GB of memory may be installed. This is because usable
memory is a calculated amount of the total physical memory minus
“hardware reserved” memory.
How much Graphics Card / Video memory does my computer have
If
your system has a dedicated graphic card installed, and you want to
find out how much Graphics Card memory your computer has, open Control
Panel > Display > Screen Resolution. Click on Advanced Setting.
Under the Adapter tab, you will find the Total Available Graphics Memory as well as the Dedicated Video memory.
Run dxdiag
You can also type dxdiag in Run box and press Enter to open the DirectX Diagnostic Tool box.
This
tool however may not report the exact memory of your video card and may
also be reporting how much total shared memory is there between your
video card and your system memory.
CPU-Z
If you are looking for a freeware to do the job for you, you can check out CPU-Z.
This tool gathers information about the main devices of your system. It
will not only give you information about your RAM, Graphics card and
video memory but also other important system information.
Occasionally, Windows users might feel the need to place password
protection on their folders. Chances are, these folders contain
sensitive information that no one else should view, no matter the
reason. T
here are several third-party free file encryption software
available that allow computer users to attach a password to their
sensitive folders and encrypt them.
However, today we are going to look
at how to password protect folders without software.
This trick is nothing new – and works even on Windows 10 / 8 / 7.
Password protect folders without software
First
thing is first: You will need to create a folder that will contain your
password-protected subfolder. Once that new folder is created, navigate
inside the folder and create a text document. Now, there is no need to give this text document a unique name because you will be deleting it after everything is done.
Once this new text document is created, just open it and copy paste the following inside:
cls

@ECHO OFF

title Folder Locker

if EXIST "Control Panel.{21EC2020-3AEA-1069-A2DD-08002B30309D}" goto UNLOCK

if NOT EXIST Locker goto MDLOCKER

:CONFIRM

echo Are you sure u want to Lock the folder(Y/N)

set/p "cho=>"

if %cho%==Y goto LOCK

if %cho%==y goto LOCK

if %cho%==n goto END

if %cho%==N goto END

echo Invalid choice.

goto CONFIRM

:LOCK

ren Locker "Control Panel.{21EC2020-3AEA-1069-A2DD-08002B30309D}"

attrib +h +s "Control Panel.{21EC2020-3AEA-1069-A2DD-08002B30309D}"

echo Folder locked

goto End

:UNLOCK

echo Enter password to Unlock folder

set/p "pass=>"

if NOT %pass%==Your-Password-Here goto FAIL

attrib -h -s "Control Panel.{21EC2020-3AEA-1069-A2DD-08002B30309D}"

ren "Control Panel.{21EC2020-3AEA-1069-A2DD-08002B30309D}" Locker

echo Folder Unlocked successfully

goto End

:FAIL

echo Invalid password

goto end

:MDLOCKER

md Locker

echo Locker created successfully

goto End

:End
We are almost done here, so don’t go running off just yet.
You
will now need to add your required password to gain access to your
“sensitive files” whenever you need them. To do this, locate “Your-Password-Here”
in the script you just copied and pasted in the text document. Delete
“Your-Password-Here” and type in your desired password. Once done, it is
time to save the document as “FolderLocker.bat”. This is only possible if “All Files” is selected.
Not
sure what that is? Don’t worry, we’ll break it down for you. Within the
document, click on File, and then Save as. After that, you should see
something called Save as type, click the drop down menu and choose All files. Once done, save the document as FolderLocker.bat and close it.
You
should now see a file with the name, “FolderLocker”. Double click on it
and it should automatically create a folder called Private, this is
where you will be storing all your sensitive data. Open it and place
your files inside, when you’re done, return to the file called
FolderLocker and double-click it. You should see the following:
Type
“Y” and press Enter. This will lock the Private folder, which will
force it to disappear. If you would like to see it again, double-click
FolderLocker again, but this time you’ll need to type the password you
have chosen. Next, press Enter.
That’s it; you’ve done well, so
pat yourself on the back. You can now safely store your sensitive files
in a password-protected folder without using a third party software.
We
suggest that you first try using this trick on empty folders, till you
get a hang of it. Don’t go on and password-protect your important data
right-away. Once you get the hang of it, you can go on and use it on
your important folders. Also if you were to forget your password, simply
right-click the FolderLocker.bat file and select Edit. You will be able
to see the password there.
Windows has a reputation for growing sluggish, but you don't have to put
up with suboptimal performance. Here are five apps to tune your system.
The Windows operating system has long been criticized because it tends
to get bogged down over time. Installing applications, patches, drivers,
etc., causes the OS to become cluttered. As a result, performance
slowly diminishes. Fortunately, a number of applications can optimize
your system and help restore performance.
1: Advanced System Optimizer
Advanced System Optimizer (Figure A)
is a thorough tool that examines and optimizes a number of areas within
your system. The application checks for everything from junk files to
registry errors to spyware. It even looks for outdated drivers. Once it
optimizes your operating system, you can configure the tool to perform
regular maintenance on a scheduled basis. Advanced System Optimizer
sells for $39.95; a free trial version is available for download.
Figure A
2: WinASO Registry Optimizer
WinASO Registry Optimizer (Figure B)
is designed to correct inefficiencies within the Windows registry. It
checks for about 20 conditions, including problems with Add/Remove
Programs, File Extensions, Device Drivers, and Fonts. Registry errors it
detects are categorized and are rated by severity. You can correct an
error by selecting it and clicking the Repair button. WinASO Registry
Optimizer sells for $29.95; a free trial is available for download.
Figure B
3: WinUtilities Free Edition
WinUtilities Free Edition (Figure C)
is handy for performing basic PC maintenance. There is also a
professional edition of this tool that performs other functions, such as
registry and disk defragmentation, file level deduplication, file
recovery, and disk cleaning. As you would expect, the application
performs basic tasks such as fixing broken shortcuts and correcting
invalid registry entries. In addition, it cleans up your browser and
your recent file history.
Figure C
4: ARO 2013
ARO 2013 (Figure D)
is a system optimizer that examines various aspects of your system,
focusing primarily on the registry. It starts out by scanning the system
registry for problems with things like application paths and shared
files. Then it cleans up and optimizes the registry.
Figure D
There
were two things I really liked about this application. First, it allows
you to choose which areas of the registry you want to scan, repair, and
optimize. That's great if you have certain portions of the registry you
want left alone. I also really liked that the software can back up the
registry for you in case it makes a mistake that causes registry
problems. ARO 2013 sells for $29.95; a free trial version is available
for download.
5: CCleaner
CCleaner (Figure E) is a free tool for cleaning up and optimizing your system. This is an outstanding tool. It can clean up the operating system (the
Recycle Bin, temporary files, clipboard, etc.), Windows Explorer (Recent
documents, Thumbnail cache, etc.), and Internet Explorer (History,
cookies, etc.). It also features a registry cleaner, which -- like ARO
2013 -- lets you choose the areas of the registry you want to work with.
CCleaner includes some other nice tools as well, such as a file finder,
a drive wiper, and an uninstaller.
In this post a complete list of Run Commands in Windows XP, 7 and 8 .
These commands allows to quickly access features and applications to
customize operative system environment.
These run commands are available for almost all settings available in Windows control panel.
Note : most part of these commands are compatible with Windows XP, 7, Vista and 8.
As someonehas kindlyreported,some commandsare not compatiblebetween different versions.Please checkthe commandsand usethe correct onesfor your versionofthe
operating system. Technical feedbacks are always appreciated, please
send me any info that it helpful to improve this post.
Yeah, I know! "How it's possible to post for Windows XP?"
Well, Windows XP is a legendary OS. Why not give it a refresh, you XP owners?
I made a lot of handy tricks for Windows XP, why not check them?
Whether you still use Windows XP every day or have an old PC you want
to give new life to, one thing's for sure - Windows XP has been around
for a long time.
From 2001 until the launch of Windows Vista in 2006 it was Microsoft's de facto operating system - and is still used by millions of consumers and businesses today.
So
whether you're wanting to speed up your trusty work PC or dust off a
classic machine from your cupboard, here are our top Windows XP tips to
breathe new life into your PC.
Windows XP Customization
1. Remove the Recycle Bin
If
you prefer to work with a completely clear desktop, you can hide the
Recycle Bin with a little Registry hack. You can still use the [Shift] +
[Delete] shortcut to access the Bin when you need it.
Choose
'Start > Run' and type 'Regedit' in the 'Open' bar. Click 'OK'. Now
browse to: HKEY_ LOCAL_MACHINE\SOFTWARE\Microsoft\Windows\Current
Version\Explorer\HideDesktop Icons\NewStartPanel. Create a new DWORD
value and name it: '{645FF040-5081-101B-9F08-00AA002F954E}'
Double-click
this and change its value to '1'. Quit Registry Editor, then
right-click an empty space somewhere on your desktop and choose
'Refresh'. The Recycle Bin icon will magically disappear from the
desktop. You can get it back again at any time by changing the value
back to '0'.
2. Make folders stand out
When
you're navigating your hard drive you can spend a lot of time looking
at folders, so it's a good idea to customise them to suit your taste.
Open the Folder Options control panel.
Here you can choose
whether to show common task links to the left of folder windows, as well
as the type of files you'd like displayed. You can change the icon or
picture used to represent a folder (see tip 5), but you can also add a
background image or colour to folders.
You could do this the hard
way - by manually editing configuration files - but a better and easier
way is to use a third-party program that can do the hard work for you. Windowpaper XP is that tool. Once installed, just select your chosen image, click 'Change Image' and select the image you want to use.
Note
that you can't stretch or centre your chosen image - if it's smaller
than the window in question it will tile, so bear that in mind when
choosing your image. If the image is too vibrant, consider creating a
copy in your image editor, then increasing the brightness and lowering
the contrast to produce a washed-out look that won't distract you when
browsing the folder.
3. Organise your applications
On
any new Windows XP installation, it's a good idea to stack the Quick
Launch toolbar on top of a double-decked taskbar so that everything you
use is close at hand. You can then add shortcuts for all of your
regularly used applications to the Quick Launch toolbar, as well as
shortcuts to My Computer and your My Documents folder.
4. Create your own theme for Windows XP
Given
that it's so important, and so easy to change, you'd have thought that
Microsoft might have included more than two themes with Windows XP.
Fortunately, it's easy to change the existing ones.
To change
themes or colours, you'll need to get into the Display Properties. To do
this, go to the Start menu and select 'Settings > Control Panel',
then in the Control Panel select 'Display'.
Click the Appearance
tab at the top of the dialog. You'll see that you can manually go in and
change the colour of every menu, piece of text, dialog box and so on.
If you don't like the default colours in the colour palette, click
'Advanced', then click the colour square, select 'Other' and you can
create your own colours using RGB or HSV values.
For easier
re-selection of colours that you create manually, click the 'Add to
Custom Colours' button once you've created a new colour you're happy
with, and it will now be added to the User Palette.
Finally, click
the 'Desktop' tab. Here you can select an image to use as a background
picture for your desktop. You can either use a small repeating pattern
that can be tiled to fill the desktop, or you can use a single larger
picture that fills the entire screen. If the picture is too small for
the screen, you can select the stretch option to ensure that it fits.
Click
the 'Browse' button to select a picture file from your hard drive.
Windows XP recognises BMP, GIF, JPG, JPEG, DIB and PNG picture formats,
as well as HTM and HTML web page formats. If your image is in another
format, such as TIFF, you'll need to convert it using your favourite image editing program.
Having
customised your display, click the left-hand tab in the Display
Properties dialog, and you'll see the Themes window appear. From here,
you can select one of the defaults from the drop-down list. More
importantly, you can save the current theme for future use.
5. Change your icons
If
you're not happy with the icons used for some of your shortcuts, you
can change them to something else that may be more obvious (or make your
own, see tip 6 below) for that particular type of application.
Right-click the shortcut, select 'Properties', and click 'Change Icon'.
Now, use the 'Browse' button to choose a file to search for icons, make
your selection, and click 'OK'.
6. Make custom icons
If
you decide to make your own custom icons, there are a few things to be
aware of. First, they come in different sizes according to where they
are displayed, such as the desktop, the Start menu, Folders, Drives, and
so on.
Icons are measured in pixels, and the three sizes used on
Windows XP are 16 x 16, 32 x 32 and 48 x 48. Second, icons use a 32-bit
palette, enabling you to use any colour that the eye can detect.
In
the past, icons were either opaque (solid), or completely transparent,
making them appear as sharp-edged cutouts on the screen. Now, they can
gently fade into the background, and you can create subtle shadow
effects.
Finally, the default Windows icons are packaged and
encoded into the shell32.dll, and many program icons are similarly
hard-coded. If you choose to replace these icons, you can either select
any of the default icons, or you can add icons you've downloaded from
the internet or created yourself in an image editor or icon creator.
Individual icons have the ICO file extension, while icon groups have the
ICL extension.
7. Remove text from icons
You
can improve the general look of your PC's desktop by removing the names
of shortcuts, leaving the icons to speak for themselves. If you try
renaming a desktop shortcut to a single space, Windows XP won't let you.
However,
you can force it to accept a space as the name by holding down [Alt]
and typing 255 on the number pad. If you want multiple shortcuts to have
blank names, you'll need to give each one a different number of spaces
to avoid them having identical names.
8. Remove programs from the 'Open With' list
Stop programs appearing on the 'Open with' list when you're trying to open an unrecognised file.
Open
Regedit and browse to HKEY_ CLASSES_ROOT\Applications, and you'll see a
list of programs that are installed on your PC as subkeys in the
left-hand pane. To remove an unwanted program from this list, select it
and right-click in the right hand pane.
Choose 'New > String value'. Name it 'NoOpenWith'. Repeat for each application that you want to remove from this list.
9. Choose a new screensaver
Windows
XP comes complete with a selection of screensavers, and it's easy to
switch between them. Right-click the desktop and choose 'Properties >
Screensaver'. There are plenty more screensavers available online too,
although be careful when looking for them. There's plenty of research
that indicates that 'free screensaver' is a search term most likely to
lead you to malicious software.
10. Personalise your folders with images
Right-click
inside a folder and select 'Customize This Folder...'. If you decide
you'd like to use a picture to represent your chosen folder, when you
use thumbnail view, the folder icon will display the picture you've
chosen. For example, if the folder is a collection of family snaps, you
might want to use a photo of your family. Alternatively, you can use the
Change Icon option to give individual folders a unique, identifiable
icon.
11. Edit your drive names
If
you've split your hard drive into two or more partitions, renaming
drives can make them easier to identify. Partitions enable you to store
groups of data separately from each other on your computer - effectively
like having multiple hard drives. Simply right-click a hard drive
partition in My Computer, select Properties, and enter a new label.
12. Disable autorun for discs
Put
a disc in your CD/DVD drive and you'll notice an appreciable lag as it
spins up, even if you're not just about to use it. If you don't always
need your CDs and DVDs to launch automatically when you insert them, the
needless spinning up of the discs can slow your machine down.
You can disable CD autorun by modifying this registry key:
'HKEY_LOCAL_
MACHINE\SYSTEM\Current ControlSet\Services\Cdrom'. Double-click the
'AutoRun Dword' value and set it to '0'. Change it to '1' to restore it.
13. Add your own sound effects
You
can configure your system so that it plays sounds to accompany various
events, such as when dialogs appear, or when you make menu selections.
Visit the Sounds section of the 'Sounds & Audio Devices' control
panel to choose from a number of pre-configured schemes, or choose any
selection of WAV files from your hard drive and create your own schemes.
You can even have your favourite song play when your PC starts up.
14. Create a mute shortcut
You can make a custom shortcut that mutes and unmutes your PC's sound by downloading a small utility called Nircmd.
Download
and extract the file contents to 'My Documents'. Next, right-click the
desktop and choose 'New > Shortcut'. Enter the following for the
shortcut location:
"C:\Documents and Settings\Owner\My Documents\nircmd\nircmd.exe" mutesysvolume 2.
Ensure
that the path points to the location where you extracted the
'Nircmd.exe' file. Name the shortcut 'mute_ unmute'. Double-click it to
mute your speakers and do so again to turn them back on.
15. Correct file sorting
By
default, a file named '2.jpg' will be sorted after one called '20.jpg'.
Many people work around this by starting single-digit numbers in file
names with a leading zero, but you can change this behaviour by making a
Registry edit.
Browse to the Registry key
HKEY_CURRENT_USER\Software\Microsoft\Windows\CurrentVersion\Explore.
Create a new DWORD value and name it 'NoStrCmpLogical'.
Right click and
modify its value to '1'.
16. Display shortcut keys
When
you open a menu or My Computer window in XP, you can see what shortcut
keys are available by pressing [Alt] once - underlined letters will
appear, and pressing that letter will trigger the appropriate shortcut,
whether it's ticking a box or selecting a button.
You can make
these underlined letters appear automatically from the 'Appearance' tab
under the 'Desktop' control panel.
Click the 'Effects' button and remove
the tick next to the box marked 'Hide underlined letters for keyboard
navigation until I press the Alt key'.
Click 'OK' twice.
17. Perform a complete redesign with these tools
If you want to go beyond the options in Windows XP itself you can try an overhaul using these customisation tools:
TweakUI: No discussion about personalising your PC would be complete without mentioning
TweakUI
- the indispensable Microsoft tool from the team behind Windows XP.
There are so many small but important changes you can make to your
system with this program, but by far the best way to find out about them
is to download it and experiment.
Talisman Desktop: If you're interested in more extreme forms of computer personalisation,
Talisman Desktop
can completely transform the appearance of your desktop - even the
default theme is something to behold, but there are plenty more
available for you to choose from.
WindowBlinds: Next you should head over to Stardock, where you'll find even more desktop enhancements. One such example is WindowBlinds,
which enables you to not only change the appearance of your windows,
but also the way they act. It's one of the most powerful customisation
tools, and you'll find plenty of other tools on offer too - the full set
is available for £32/$50 as part of the Object Desktop suite.
21. Use Group Policy Editor
Windows XP
Professional Edition includes the Group Policy Editor, which is a very
powerful tool that enables you to configure what permissions and access
each account has. This isn't available in the Home Edition.
To
launch it, Choose 'Start > Run' and enter gpedit. msc in the 'Open'
bar. Click 'OK'. Expand 'User Configuration' in the left-hand pane.
You'll see subfolders for 'Software settings', 'Windows settings' and
'Administrative templates'.
By expanding these, you can find a
range of options to configure. Expand 'Administrative templates',
followed by 'Control panel'. Here you can alter what appears in the
user's control panel.
One particularly useful setting is the one
that prohibits access so you can stop other users changing your
settings. Double-click 'Prohibit access to the control panel' in the
right-hand pane. This opens a dialog. Select 'Enabled' and click 'OK'.
Choose the 'Explain' tab to find out more about this setting.
Each
setting listed here has three options for configuration. 'Not
configured' means you'll make no change to the current setup. 'Enabled'
turns the setting on, and 'Disabled' turns it off again. It's worth
exploring the various configurations you can make, but make sure you're
fully backed up before you do so.
22. Restrict folder access in Group Policy Editor
In
Group Policy Editor you can restrict folder access by disabling Simple
File Sharing and then right-clicking the folder you would like to
protect and selecting 'Properties'. Move to the 'Security' tab and
you're ready to restrict folder access.
Now 'Add' and then select
the user you would like to restrict. Tick the top box in the 'Deny'
column to prevent the selected user from accessing, viewing or modifying
the files in the folder you selected.
23. Restrict hard drive access in Group Policy Editor
You
can restrict access to certain hard drives by clicking 'Start >
Run', typing 'gpedit. Msc' and pressing [Enter]. In the User
Configuration section, you'll need to navigate to 'Administrative
Templates\Windows Explorer' to choose the hard drives you want to
restrict.
24. Lockdown the Start menu
To
restrict access to the Start menu, navigate to the Start menu and
taskbar section and you can add restrictions. Disabling the Run command
and search function can help prevent other users from locating system
files.
Note: You may find that the changes you make in the Group
Policy Editor do not seem to be carried out immediately. You can force a
refresh of the settings by opening a command prompt ('Start > Run'
and type 'cmd') and typing 'gpupdate' before clicking [Enter].
If
you find you can't access the Group Policy Editor (gpedit.msc), make
sure that you're logged on as an administrator, since limited accounts
can't access this tool. Remember, Group Policy Editor is only included
with Windows XP Professional.
25. Limit control panel access
Before
you disable any Control Panel items, we advise creating a shortcut for
easy access. Open the Control Panel, highlight all the applets and drag
them to your desktop to create shortcuts. If you're using Windows XP
Home Edition, you'll need to edit the Registry to disable access to
certain Control Panel applets. Click 'Start > Run', type 'Regedit',
then click 'OK'.
Go to
HKEY_CURRENT_USER\Software\Microsoft\Windows\CurrentVersion\Policies\Explorer.
Click 'Edit > New > DWord Value' and name it 'DisallowCpl'. Give
it a value of 1.
To disable applets in the control panel go to
'Edit > New > Key' and name it 'DisallowCpl'. Click 'Edit > New
> String' and name it '1'. Double-click to set the value to the name
of the applet to disable using the list in the box above.
Beneath
the Control Panel tree entry you'll see four more folders that you can
use in order to customise which Control Panel tabs are made available.
26. Encrypt an entire folder
Instead
of restricting other users you could always just encrypt important
folders in Windows XP. You need to select the folder to encrypt by
right-clicking 'Start > Explore'. Navigate to the directory then
right-click it and select 'Properties'.
Click 'Advanced' and
check 'Encrypt Contents' to secure data. Click 'OK > OK'. This will
encrypt the currently selected folder. Windows XP can apply this setting
to just the files contained or to all the files and folders.
You'll
be prompted to confirm whether you wish to apply encryption to just the
selected folder, or to also encrypt its subfolders. Choose the option
that suits you and then click 'OK'. In Windows XP it's easy to tell
which files have been encrypted - all encrypted files are coloured
green, and compressed files are blue.
Note: Encrypting File System (EFS) is part of Windows XP Professional, but not the Home Edition.
27. Unload application DLL files on closure
It's
possible to configure Windows XP systems with large amounts of memory
such that the core operating system files are never paged to virtual
memory, thus improving responsiveness and performance.
Similarly,
it's also possible to force Windows XP to automatically unload DLL
files from memory when an application is closed. To do so, open Registry
Editor, browse to
HKEY_LOCAL_MACHINE\SOFTWARE\Microsoft\Windows\CurrentVersion\Explorer
and create a sub-key named AlwaysUnloadDLL. Double-click the (Default)
value and change it to '1'.
28. Keep the Windows XP OS in RAM
This
tweak is relatively easy to apply. Open the Registry Editor and browse
to
HKEY_LOCAL_MACHINE\SYSTEM\CurrentControlSet\Control\SessionManager\Memory
Management. Change the value of the DisablePagingExecutive DWORD value
from a '0' to a '1', and you're off to the races.
This will limit
the kernel files to physical RAM, which means you should only consider
applying this tweak on systems with more than 256MB of RAM.
29. Disable unnecessary services
Reclaim
memory and other resources by streamlining which services run on your
PC. Open Task Manager (Use shortcut [Ctrl]+[Shift]+[Escape]) on the
'Processes' tab.
Click the 'Image Name column' header once to
sort processes by name, then find all the svchost.exe entries. Make a
note of their size in KB. Next, you'll need to open the Services
console. Click 'Start > Run', and type 'services.mmc'. A list of all
currently installed services is displayed in alphabetical order, along
with their statuses, telling you if they are running or not.
Double-click
a service and identify its file from the 'Path to executable' box.
Search for this file name in your favoured search engine to find out
more about it.
Various services rely on other services to
function, so you need to verify your service isn't required by another
one you want to use. Switch to the 'Dependencies' tab to check for
dependants.
Once you've verified that you don't need a service,
change it to Manual by double-clicking its entry and changing its
Startup type. Don't disable it unless the service could be a security
risk.
After disabling the unnecessary services, restart Windows
XP. Check the memory consumption of svchost.exe in Task Manager again -
use the Commit Charge figure to help determine how much memory you've
saved.
30. Reduce hanging time
By
default, Windows waits for five seconds to allow time for any hung
applications to be closed properly as you shut down your computer. You
can change this hanging time with a registry edit.
Browse to
HKEY_CURRENT_USER\Control Panel\Desktop and select the string entry
called 'HungApp Timeout'. If you're using Vista, you'll need to create
this entry. Right-click this and choose 'Modify'.
The number is in
milliseconds, so the default of 5,000 is a wait of five seconds. Simply
choose a lower number to shorten the wait time.
31. Improve performance by configuring custom hardware profiles
Windows
XP has a default hardware profile that loads drivers for all your
installed hardware. If you have an older PC there will be times where
you won't want all hardware to be functioning, for instance when
watching a DVD. To avoid choppy playback as a result of resources being
consumed by loaded drivers, applications and services, here's how to set
up a custom hardware profile.
Open the System applet through the
Control Panel. The Hardware tab gives access to the Device Manager, as
well as driver signing options and hardware profiles.
Click the
'Hardware Profiles' button to open the Hardware Profiles window. You can
view available profiles and configure how hardware profiles will be
displayed during the boot process.
With 'Profile 1 (Current)'
selected, click 'Properties' to configure basic settings, such as
specifying whether the system is a portable computer. Then click 'OK'.
Click
'Copy'. In the Copy Profile window, give the new profile a descriptive
name, such as 'Basic', and click 'OK' to create a second, identical
profile you can configure with different settings.
Click OK to
close the applet. Reboot Windows XP. From Hardware Profiles, select the
new profile, then log on. Open the System applet, return to the
'Hardware' tab, click 'Device Manager'.
Expand a device type such
as 'Network Adapters', then right-click the device and choose Disable or
Enable - if disabling, click 'Yes'. Disabling devices frees up
resources for this profile's specific job.
You don't always have to be in front of your PC to access it. Here
are a few handy ways to remotely tap into your PC's workspace, whether
you're away and need to check in with your work or home PC or just need
someone else to come to your rescue.
32. Set up a virtual private network
Virtual
private networks (or VPNs) are a way to link computers together in a
secure, transparent manner using the Internet. Windows XP has made the
process simple.
Open the Network Connections window ('Start >
Settings > Network Connections' or 'My Computer > Control Panel').
If a web connection hasn't been created yet, you must define one.
From
the Network Connections File menu, select 'New Connection' or choose
'Create a new connection' from the Network Tasks panel.
The New
Connection Wizard launches and shows what you can configure. Although
it's not called a virtual private network, the second option is what
we're trying to set up. Click 'Next'.
You'll be presented with a
window asking you to choose the type of connection you want to create.
Click the radio button next to 'Connect to the network at my workplace',
then click 'Next'.
You now have two choices: Dial-Up and VPN
connection. Select 'VPN' and click 'Next' to continue. Even though you
can configure a VPN over a dial-up line, that option is for
non-tunnelling. (A VPN tunnel is a connection between two computers over
a LAN, WAN or internet network that's maintained as a consistent, more
permanent connection rather than temporary connections you'd use to get
to something like a website or FTP server).
Each VPN connection is
identified by a name, usually representing the gateway you're
connecting to. You must identify the gateway at the other end of the
tunnel. Enter either the IP address of the VPN gateway you want to
connect to, or its fully qualified domain name.
A summary screen
appears, specifying the VPN connection name and the users allowed access
to the connection. If you want a shortcut placed on your desktop, check
the Shortcut option. Click 'Finish' and a window asks for your user
name and password. This login is transmitted and encrypted when you
access the VPN gateway.
Click 'Connect' to start. If your
connection doesn't establish itself right away you may need to tweak
some parameters. Right-click the connection icon and select
'Properties'. Select the 'Security' tab.
Under Security Options
select 'Typical'. The box under 'Validate my identity as follows' should
show 'Require secured password'. The 'Require data' encryption box
should also be checked. To use your login and domain settings for the
VPN validation, check 'Automatically use my Windows login name and
password'. This is useful for connecting to corporate networks.
Note: Make sure the Windows Firewall is configured and working correctly with your VPN or your connection will be blocked.
If
you just want to check on your home computer every now and then, you
may want to consider using Remote Desktop instead (see tip 33).
33. Access your PC from work with Remote desktop
Windows
XP Professional includes the facility to enable your computer's desktop
to be accessed remotely from other PCs via the Remote Desktop
Connection tool.
Right-click the My Computer icon on your desktop
or start menu and click 'Properties'. From the Remote tab, tick 'Allow
users to remotely connect to this computer'. Click 'OK' and add a
password to your account from the User Accounts Control Panel. Remember,
a password is mandatory.
To control your PC from another PC, click 'Start > All Programs > Accessories > Communications' or download the Remote Desktop Client.
A
screen will appear for you to select your target PC from the drop-down
menu or type in its name/IP address and click 'Connect'. If your
firewall throws up a prompt, allow the connection.
You'll need to
log on using your password. Once done, you can use the PC as if you were
sitting at it. To relinquish control close the dialog. To change
settings, open Remote Desktop Connection and click 'Settings'.
34. Speed up the remote desktop
You
can improve the performance of Remote Desktop sessions, particularly on
slow connections, by disabling a number of superfluous graphical
features. To choose the settings you would like to use, launch the tool
by clicking 'Start > All Programs > Accessories >
Communications > Remote Desktop Session'.
Click the 'Options'
button to expand the dialog and move to the 'Display' tab. Here you can
choose the resolution and colour depth that remote sessions should run
at - choose lower settings if things are running slowly for you.
Moving
to the 'Experience' tab, you can use the drop-down menu to choose what
type of connection you're using, and Windows XP selects the best
settings for you. Alternatively, simply clear the tick box next to any
of the graphical features you feel you can live without to create your
own custom remote desktop profile.
35. Request assistance from a friend
The
'Remote' tab also enables you to allow Remote Assistance invitations.
This is a useful feature that means another user can effectively take
control of your PC from their own Windows XP machine for troubleshooting
a problem you might be having.
Click 'Start > Help and
Support'. Under 'Ask for assistance', click 'Invite a friend to connect
to your computer with Remote Assistance'. Choose 'Invite someone to help
you' to start the invitation process. Enter the person's email address
and click 'Invite this person'. Type an explanatory message and click
'Continue'.
For security reasons, set an expiry time or date for
the invitation, plus a password that your friend will need to enter.
You'll need to communicate this separately by phone or another email.
Click 'Send Invitation'.
Once your friend receives the email,
they'll initiate the process of connecting to your PC. You'll see a
pop-up window asking you to accept the connection - click 'Yes' to give
your friend access and start troubleshooting.
Keep your precious data safe by getting to grips with Windows XP's
built-in backup and recovery features and other useful third-party apps.
36. Save your data with System Restore
System
Restore keeps a note of everything you change on your Windows XP
computer, enabling you to reverse them with a couple of clicks if
necessary.
System Restore is switched on by default when you
install Windows XP, although it's always worth double-checking by
selecting 'Start > Programs > Accessories > System Tools >
System Restore'. Windows XP creates restore points automatically, once a
week or just before you install new software, but you're not bound to
this schedule - you can create your own restore points whenever you
like.
Note that the Recommended Restore Point is simply the last
one, but you don't need to remember what it did, since all the important
changes are listed for you.
To see more restore points, simply
click 'Choose a different Restore Point' followed by 'Next'. This lists
the ones that Windows has saved, and by clicking 'Scan for affected
programs' you get additional detail without having to actually run the
process.
37. Keep your files safe using MS Backup
Microsoft
has included MS Backup with both the Professional and Home versions of
Windows XP. However, Home users will need to install it from the
original Windows XP CD - you'll find the NTBACKUP.MSI file in the
\VALUEADD\MSFT\NTBACKUP folder on the CD.
Once installed, run it
from the 'Start > Programs > Accessories > System Tools' menu.
MS Backup is a basic old-school backup tool, which provides you with a
tree list of all the files on your PC for you to select which ones you
want backed up.
It starts in Wizard mode - using this you can
pretty much take care of all your backup needs. You can choose to save
your files to a network drive, but in most cases you'll be burning to a
DVD.
The default is to enable Windows to choose which files to
back up - which includes the desktop, libraries and standard Windows
folders, such as Documents. This will cover 99% of the files you want,
but you can add more or be more selective if you need to be.
38. Recover system passwords
If
you use online resources that require you to log in, you probably told
Internet Explorer to remember your password so that in future you won't
need to enter one. But what's under those asterisks? To see, download
the Password Spectator Lite software. Launch the program, and ensure you press 'Stay On Top', because this will make things easier.
Fire
up your web browser and pay a visit to the website that requires you to
log on. Enter your user name and hit [Tab] to force Internet Explorer
to automatically enter your password for you. Highlight the text masked
with asterisks and hold down [Ctrl]. Move the mouse away from the
password and click with the left mouse button. Your password will now be
revealed.
Password Spectator can also recover passwords from
other applications. This works in the same way as well, just find your
hidden password and press the [Ctrl] key.
Turn off Internet
Explorer's password-remembering option by clicking 'Tools > Internet
Options > Content'. Click 'AutoComplete' and clear the two boxes
relating to passwords.
39. Create remote backups of your data
Back
up your data to DVD with Windows XP Backup and Restore or even send it
to a compressed file that you can copy to a network or share on another
computer.
If you use Windows XP Professional Edition then the
Backup Utility will already be installed on your system. However, for
Home Edition users, it may not be. You can find out by placing the
installation disc in your drive and browsing to VALUEADD\MSFT\NTBACKUP.
Once you've located that directory, double-click ntbackup.msi and begin
the installation.
Click 'Start > All Programs > Accessories
> System Tools and Backup'. Leave the check box, 'Always start in
wizard mode', as this will guide you through the process. Click
'Advanced Mode'.
Select the 'Advanced Mode Wizards for backup or
restore'. Here we'll run the backup manually to step through the
process. Click 'Backup'. Go through the file system, checking the files
and folders you intend to back up. Change the backup media or file name
to the appropriate target device. Click 'Start Backup'.
Leave the
'Append' radio button selected and alter the backup description to your
choice. The text string shows what to write on the media if you intend
to label it. Click 'Advanced'.
Check 'Verify Data After Backup'.
This will take longer to finish but it ensures data integrity. Leave the
other check boxes clear. Backup Type is where you pick the backup
method. Click 'Start Backup'. You'll see the Backup Progress box,
showing the job label, the job status, and an estimated completion time.
When finished, click 'Report' and scan it for errors.
40. Securely erase data from your hard drive
To
speed file deletion up, Windows XP merely marks the beginning of a file
when you delete it, which enables other files to reside in the space
taken by that old file. Until the file is overwritten, however, it's
retrievable. You can bypass this problem with a free third-party app
called Eraser.
Once
installed, you can securely delete any file by right-clicking the file
in question and choosing 'Erase'. Click 'OK' to use the default options
or 'Options' to choose a different method.
If the files have
already been deleted, launch Eraser and click 'On Demand', select 'File
> New Task' to set up the task to wipe a drive's free space. Select
the drive you wish to scrub from the drop-down menu, tick 'Keep task on
the list' and click 'OK'. Right-click the task and choose 'Run'. Read
the warning, click 'Yes' and prepare to wait.
The standard Windows XP installation is designed for ease of use
rather than outright speed, and once you've got used to the basics there
are plenty of adjustments that you can make so that both you and your
PC can work faster. Here's a selection of the best time-saving changes
you can make.
41. Prioritise your Start menu shortcuts
Windows
XP can intelligently sort the Start menu so that your most frequently
used programs are always accessible in the lower portion of the menu.
You
can ensure that certain programs always stay at the very top of the
menu if you like, enabling you to launch programs in a couple of clicks.
Navigate through the Start menu and locate the shortcut for one of your
more frequently used programs.
Right-click this shortcut and
select the 'Pin To Start' option from the menu that appears. The
shortcuts now appear in the top portion of the Start menu beneath the
shortcut for Internet Explorer.
42. Organise your Start menu alphabetically
As
you install more and more programs on your hard drive, your Start menu
can become harder to navigate because shortcuts are displayed in order
of creation.
To make programs easier to locate, it may be useful
to alphabetise your menu. Click 'Start > All Programs', right-click a
shortcut and select the 'Sort By Name' option. If this becomes
frustrating, check out tip 44 to force the Start menu to stay in order.
43. Access control panels from the Start menu
If
you like to change system settings from time to time, you'll appreciate
how long it takes to visit the Control Panel. If you're making a large
number of changes to your PC, it can take a while to navigate the Start
menu, open the Control Panel and launch the relevant applet.
A
useful way to speed up access to individual Control Panel components is
to add a menu to the Start menu that appears when you click the Control
Panel option, giving you instant access to any applet.
To do
this, right-click the Start button and select 'Properties'. If you're
using the Windows XP-style menu, click the upper 'Customize' button and
move to the 'Advanced' tab.
At the top of the list that appears,
select the 'Display as menu' option beneath the Control Panel heading.
If you're using the Classic Start menu, click the lower 'Customize'
button and tick the box labelled 'Expand Control Panel'.
44. Put the Start menu in order
To
force the Start menu to stay in order, click 'Start > Run', type
'Regedit' and press [Enter]. Select the following key:
HKEY_CURRENT_USER\Software\Microsoft\Windows\CurrentVersion\Explorer\MenuOrder.
Choose
'Edit > Permissions', click 'Advanced' and untick the 'Inherit from
parent the permission entries…' box. A pop-up dialog will appear. Click
'Copy' followed by 'OK' to return to the first screen.
Finally,
select your user name from the list and clear the 'Allow' tick box next
to Full Control (but leave the 'Read' tick box alone) and click 'Apply'.
Repeat for the Administrators group. Finally, click 'OK'.
45. Cut the Start menu delay
There's
a slight delay built into the Start menu to give you thinking time. If
you know your way around, you can shorten it with a Registry edit.
Open the Registry Editor by choosing 'Start > Run' and entering 'Regedit' in the 'Open' bar, then clicking 'OK'.
Now
go to 'HKEY_CURRENT_USER\Control Panel\Desktop'. Double-click the
'MenuShowDelay' value and change it from the default 400 to a lower
number of your choice.
46. Create your own toolbar
You
can turn a folder into a toolbar for quick and easy access to its
contents. Right-click the taskbar and choose 'Toolbars > New toolbar'
from the menu. This launches the 'New toolbar' dialog.
Select the
item that you want to use as a toolbar. If necessary, browse through
'My Documents' or 'My Computer' to find the folder you want.
Alternatively, click 'Make new folder' to create a custom one. Click
'OK'. Your new toolbar will appear as a button on the taskbar.
Click
this to see an expanding menu of its contents. Subfolders become their
own expanding menus. Select a file to open it in its associated
application.
47. Use the Quick Launch toolbar
Fed
up of having to hide all open windows to access your desktop shortcuts?
Move them to the Quick Launch toolbar instead, which appears at the
bottom of the screen and is accessible whatever windows are open.
Start
by right-clicking a blank area of the taskbar and choosing the 'Lock
the taskbar' option to remove the tick and unlock it. You'll see the top
edge of the taskbar change, indicating it can now be moved or altered.
Click and hold the top edge and you'll see the cursor change to a double
arrow. Drag this up so the taskbar takes up two lines instead of one.
Right-click the taskbar again and choose 'Toolbars > Quick Launch'.
As
things stand the two toolbars sit side by side - we want the Quick
Launch to sit on top of the other. To do this, click and hold on the
spotted border to the right of the icons and drag it into place as shown
above.
48. Get quicker file searching
If
you search for files on a regular basis, you can save a great deal of
time by enabling the Indexing feature. Open up My Computer, right-click
your hard drive and select 'Properties'. Tick the box labelled 'Allow
Indexing Service to index this disk for fast file searching', and click
'Apply'.
Make sure that the option labelled 'Apply changes to
[drive letter]:\, subfolders and files' is selected and click 'OK'. More
in-depth searches, such as looking for files containing certain words
or phrases, are now performed much quicker.
49. Find Messenger contacts more easily
If
you use Windows Messenger to conduct conversations with friends and
family, there's a good chance that you've built up a large list of
contacts. While it's great to have a lot of people to talk to, an overly
long list can make it difficult to find individual contacts when you
want to start a new conversation.
By default, your contacts are
split up into a number of pre-defined categories, but you can create
your own to help keep yourself organised. Right-click one of the
existing group headings and select 'New Group'. Enter a name, and then
drag and drop contacts on to the heading. You can expand and collapse a
group by clicking the double-headed arrow to the left of the heading.
50. Save time with keyboard shortcuts
You
can access many Windows XP functions using keyboard shortcuts, which
can be much quicker than using a mouse to navigate through menu options.
To quickly access Explorer, press [Windows] + [E]; to access the
Run dialog press [Windows] + [R]; and to search for files press
[Windows] and [F].
You can log out of your user account by pressing
[Windows] + [L].
51. Attach files to emails in two clicks
Rather
than starting a new email and navigating through folders to attach a
file, you can simplify the process. Right-click the file you want to
send and click Send To > Email Recipient. Your email client opens
with a new blank message, with the selected file attached.
52. Disable menu animation
You
can turn off animated menus in Windows XP for faster navigation. In
Regedit, open the key 'HKEY_CURRENT_USER\Control Panel\Desktop' and
create the string value 'MinAnimate'. Give it a '0' value. To restore
menu animations, delete this string value.
53. Return to your Desktop in an instant
When
you're working with a number of programs at once and want to return to
your desktop, it can take some time to minimise all the open windows
individually.
It's quicker to use the Show Desktop shortcut on
the Quick Launch bar, or press the [Windows] key on your keyboard and
[M] simultaneously. To restore your windows to their previous states,
press [Windows] + [Shift] + [M].
54. Send files faster
If
you're attaching files to an email, you can compress them to radically
reduce the amount of time it takes for the mail to be sent and received
using the Windows XP support for compressed files and folders. Select
the files you want to attach to an email, right-click them and select
'Send To > Compressed (zipped) Folder'.
55. Say 'No to all' requests
When
you're copying or moving a group of files, you'll sometimes be prompted
to provide a 'Yes' or a 'Yes to all' response - if you need to give
permission for a process to to overwrite existing files, for example.
Choose
the latter option and similar files that prompt the same question will
be ignored in future. But what if you want 'No to all' instead? There's
no visible option, but you can select 'No to all' by simply holding the
[Shift] key as you click 'No'.
56. Manage the Send To folder
You
can extend the Send To option by adding custom entries. It's basically a
folder on your hard drive that you copy shortcuts to, so to access it
click 'Start > Run', type 'sendto' and press [Enter].
Create
shortcuts to favourite drives, folders and even programs in here to give
you speedy shortcuts from any Explorer window, simply by right-clicking
the file or folder in question and choosing 'Send To'.
If you
select a program you've added to the menu, your selected file is opened
with that program; choose a folder you've added, and the file is copied
to it.
57. Switch users quickly
If
you share your computer with others, giving everyone their own user
accounts is a time saver in itself, because that way each person can set
up the computer exactly the way they want it, without impacting on
anyone else's experience.
The only problem with having multiple
user accounts set up is if someone else suddenly wants to nip onto the
PC for a few minutes - perhaps to check their email or copy a file to a
CD.
Saving your work and logging off is time consuming, so switch
on Fast User Switching, which enables you to switch user accounts
without logging off first.
When the other person has finished,
either switch straight back or log them off before returning to the
point you were at. To do this, open the User Accounts Control Panel,
click 'Change the way users log on or off' and tick the box next to 'Use
Fast User Switching'.
58. Copy and move files with the Context menu
If
you frequently copy or move files, you'll have found yourself juggling
windows or copying and pasting files left, right and centre. You can
save time by adding two options - Copy To Folder and Move To Folder - to
the menu that appears when you right-click a folder or file -
ordinarily this would involve editing the Registry (see tip 59 below for
how to do this yourself), but we've found a time-saving workaround.
Go to this Kelly's Korner page
and click the 'Copy to/Move to' link (it's number 45) on the page.
Right-click this and save the reg file to your desktop. Double-click it
and click 'Yes' when prompted - the options will now appear when you
right-click a file. Alternatively, try the method in the next tip.
59. Add new 'Copy to' key
Add a 'Copy to folder' option to the right-click context menu so that you can quickly copy a file by right-clicking it.
In
the Registry Editor, browse to
HKEY_CLASSES_ROOT\AllFilesystemObjects\shellex\ContextMenuHandlers and
create a new key called 'Copy to'. Change its default value to
'{C2FBB630-2971-11d1-A18C-00C04FD75D13}' and check it works in Windows.
You
can also add a 'Move to folder' option in this way. From the same
'ContextMenuHandlers' key, simply create a new key called 'Move to' and
then change its default value to
'{C2FBB631-2971-11d1-A18C-00C04FD75D13}' to do this.
60. Halve folder and file access times
To
open a folder or launch a program you have to double-click its icon.
You can cut the launch time in half by opening the Folder Options
Control Panel and selecting the option labelled 'Single-click to open an
item (point to select)' and press 'OK'.
61. Start your computer faster
Every
time you turn on your PC, besides Windows XP itself there are usually a
number of programs that load in the background. Over time, this list of
programs can grow and grow, resulting in a slow, sluggish computer.
Many
of these programs aren't actually needed when you start your PC, so
disabling them will save at least several seconds off your boot time. It
will also free up memory in Windows XP, resulting in zippier
performance all round.
To do this easily you'll need a free start-up manager called Autoruns.
Once installed, click 'Run', then 'Run' again. Switch to the 'Logon'
tab. Select an entry to see more about it - if you need help identifying
it, right-click it and choose 'Search Online'.
Never delete an
entry until you're sure you won't need it - instead, untick an entry to
disable it. Reboot your PC and verify that disabling the entry doesn't
cause problems. Once you're confident you no longer need it, delete it.
If
you're suspicious that there might be some obsolete entries in the
list, right-click them and choose 'Verify'. If they are still working,
you'll see [Verified] appear next to the publisher's name; if not, [Not
Verified] will be shown.
62. Skip welcome screen
You
can choose to log into Windows automatically and bypass the welcome
screen by making a simple tweak. To do this, choose 'Start > Run' and
enter 'control userpasswords2' into the 'Open' bar. Click 'OK' to see a
dialog showing each user installed on the PC.
Clear the box
marked 'Users must enter a user name and password to use this computer'.
Click 'OK'. Now restart your PC and you should go directly to your
desktop.
63. Shut down your computer quickly
Rather
than using the Start menu to instigate a system shutdown, you can
create a shortcut on your desktop to enable you to switch off with a
simple double-click.
Right-click an empty section of the desktop
and select 'New > Shortcut'. In the box that appears, type 'shutdown
-s' to create a shutdown shortcut, 'shutdown -r' to create a restart
shortcut, or 'shutdown -l' to create a shortcut that logs out of the
current user account.
By default, when you double-click one of
your new icons, your selected action will not take place for 30 seconds.
To make things happen instantly, you need to add an extra parameter to
your shortcut. To create a shortcut that shuts down your PC after five
seconds, for instance, you would need to use the code, 'shutdown -s -t
05', as your command string. While you can technically change this to
zero, we don't recommend this.
Once you've created the shortcut,
you can leave it where it is or drag it to your Quick Launch bar so you
can turn off your PC with a single mouse click. You can also change the
icon to make it more easily identifiable. Simply click the Change icon
button in the shortcut properties and select a new one.
64. Speed up your desktop
Every
icon on your desktop takes up memory. You can reduce the number of
icons on display by deleting some manually, or by using the Desktop
Cleanup wizard to automate the process.
To access this tool,
right-click an empty section of your desktop and select 'Properties',
then move to the 'Desktop' tab and click the 'Customize Desktop' button.
While
you're here, it's a good idea to tick 'Run Desktop Cleanup Wizard every
60 days', because this wipes out unnecessary and unused icons every
couple of months.
To run the tool straight away, click 'Clean
Desktop Now' followed by 'Next'. The wizard then tells you which of your
icons haven't been used for a while and are prime candidates for
removal. If you'd prefer to keep any of the icons, clear the tick box
next to them. Click 'Next' and then 'Finish' to complete the process.
65. Speed up your desktop, Part 2
When
you configure the settings for your desktop, it's natural to opt for
the highest possible settings. Although you use your monitor's native
resolution you can dramatically speed up your system by reducing the
number of colours that are used. Rather than opting for 32-bit colour
depth, drop this setting down to 16-bit.
Right-click the desktop,
select 'Properties', move to the 'Settings' tab and use the Color
Quality drop-down menu. In general use, you'll notice no difference
between the colour depths, but using the lower setting frees up far more
memory for applications to use.
66. Keep your hard drive defragged
One
of the biggest bottlenecks of a poorly performing computer is the hard
drive. Due to the way files are organised on your hard drive, they can
fragment over time, which makes accessing them slow and also reduces the
lifespan of your hard drive as it has to do more work to access the
files, leading to its components wearing out that little bit sooner.
The
solution is to defragment your drive. Windows XP has its own built-in
tool for the job, but a better bet is to use a free tool called Smart Defrag from iOBit.
Once
installed, tick each hard drive and click the Analyze button. Once
complete, follow its advice (typically 'Fast optimize and defrag'). The
first defrag will take a while to complete, but once done, Smart Defrag
can be left to its own devices, working unobtrusively in the background
to keep your drives optimised.
67. Read text quicker with Cleartype
This
little tip should help you enhance the display on an LCD monitor. To
achieve better, crisper fonts, you should enable the Cleartype font
smoothing for your screen.
This can be done in the following way.
First of all, right-click an empty space on your desktop and select
'Properties'. Now move to the 'Appearance' tab and click 'Effects'.
Tick
'Use the following method to smooth edges of screen fonts' and then
select 'Cleartype' from the dropdown menu next to it. Finally, click
'OK' to apply the new settings. You will experience a richer, less fudgy
display on your LCD screen after this change.
68. Get rid of error reporting
If
you're tired of those annoying error messages that pop up when an
application or system error occurs, the System applet in the Control
Panel gives you some control over the situation.
Right-click the
My Computer on your desktop or Start menu then click 'Properties'. From
the 'Remote' tab, click 'Error Reporting' on the 'Advanced' tab. Error
Reporting is enabled by default for Windows XP and all installed
programs. To choose what's monitored, click 'Choose Programs'.
If
you only want to exclude a handful of programs, click 'Add' at the
bottom of the box, then click 'Browse' to locate and select the program
executable (such as acrobat.exe). Click 'OK'.
To disable error
reporting for all except specified programs, select 'All programs in
this list'. Click 'Add' to select programs - all Microsoft programs and
Windows components are selected.
As we're all aware, there are many times when internet browsing just
slows to a crawl for no apparent reason. It's not always possible to
upgrade your internet connection, but there are plenty of ways that you
can make Internet Explorer more efficient.
Sometimes it's a
matter of trading off image quality for speed. In other cases you may be
able to surf more efficiently by adopting keyboard shortcuts or using
suitable add-ons.
69. Turn of your images
Web
pages that lack pictures will load much faster and you're still able to
view text, of course. Click the 'Tools' button and choose 'Internet
Options'.
Switch to the 'Advanced' tab, scroll down to the
Multimedia section and untick 'Show Pictures'. Click 'OK' and you'll see
frames in place of individual images - right-click one and choose 'Show
Picture' if you need to see what it is.
70. Restrict multimedia
Turn
off animations and sounds for faster loading times - again, the option
is in the Multimedia section on the 'Advanced' tab of 'Internet
Options'.
Untick 'Play animations in webpages' and 'Play sounds
in webpages' before clicking OK. You'll need to restart IE for the
changes to take effect.
71. Go back home quickly
Return
to the previously viewed page by pressing the [Backspace] key, or hold
down [Alt] and press the right arrow key on the Number Pad to go one
page forwards again.
72. Organise bookmarks
Putting
your bookmarks in order makes it easier to find the one you're looking
for. Press [Ctrl] + [B] to open the 'Organize Favorites' dialog, and
then organise them into folders for quick and easy access.
73. Speed up web page requests
When
you type a website's name into your browser, that in itself isn't
enough to access the site. The web address needs to be translated into a
four digit IP address (212.58.224.138 in the case of the BBC), which is
done by a Domain Name System (DNS) server. Your ISP uses its own DNS
servers, which aren't always the quickest or safest. OpenDNS
provides free DNS servers that anyone can use.
They're fast enough to
make a difference to your browsing speed, and you don't need to install
any software to set them up.
To apply OpenDNS to your entire
network, log on to your router and look in the setup section for an
option to set static DNS servers. To use it with a single PC, click
'Start > Control Panel > Network and Internet Connections'.
Click
'Network Connections', right-click your main network connection and
choose 'Properties'. Scroll down to select 'Internet Protocol (TCP/IP)'
and click 'Properties' again. Choose 'Use the following DNS server
addresses'. The two DNS server addresses you need to enter are
208.67.222.222 and 208.67.220.220 respectively. Once set you'll need to
reboot either your router or your PC for the changes to take effect.
74. Navigate quickly
To quickly return to your browser's home page regardless of where you are on the web, hold down the [Alt] key and press [Home].
75. Increase connections
Force pages to load faster by increasing the number of connections available to Internet Explorer.
Click
'Start > Run', type 'Regedit' and press [Enter]. Browse to
HKEY_CURRENT_USER\Software\Microsoft\Windows\CurrentVersion\Internet
Settings.
Find and right-click 'MaxConnectionsPerServer', choose
'Modify' and select 'Decimal'. Enter '6' as the value. Do the same for
'MaxConnectionsPer1_0Server'. If neither exist, create them yourself:
choose 'Edit > New > DWORD value' to do so.
76. Accelerate surfing in Internet Explorer
Select
some text by dragging the mouse over it and click the arrow icon that
appears next to it - from here you can access any accelerators you or
IE8 has (automatically) installed. For example, the Wikipedia
Accelerator that enables you to do a quick search based on the
highlighted text.
77. Re-register a DLL
If
Internet Explorer (8 and above) is behaving sluggishly, try the
following: click 'Start > Run', type 'cmd' and press [Enter]. Next,
type 'regsvr32 actxprxy.dll' and press [Enter], making sure there's a
space after 'regsvr32'. Close the window, restart your PC and you may
notice a significant speed boost.
78. Optimise the cache
If
you're still on a slow dial-up internet connection, then a large
internet cache for your temporary files can speed things up; conversely,
if you have a fast broadband connection, shrinking the size of the
cache will speed things up, because IE won't spend so long searching the
cache before downloading from the web.
79. Change cache size
Click
'Tools' and select 'Internet Options > General'. Click 'Settings'
under 'Browsing History' to change the cache size - experiment with
different figures to see which works best.
80. Quick site access
If
you want to access a .com site quickly, just type the middle part of
the URL between www. and .com (for example, microsoft instead of
www.microsoft.com) and press [Ctrl] + [Enter].
That's all well and
good for .com addresses, but you can instruct Internet Explorer to do
the same for a different domain name, such as co.uk if you prefer.
To
do this, click 'Start > Run', type 'Regedit' and press [Enter]. Now
browse to the following Registry key:
HKEY_CURRENT_USER\Software\Microsoft\Internet
Explorer\Toolbar\QuickComplete.
If QuickComplete doesn't exist,
right-click 'Toolbar' and choose 'New > Key', calling it
QuickComplete. Now select QuickComplete and choose 'Edit > New >
String Value'.
________________________________
Well, you've reached to the end of this post.
Did you like it? Do you have something to add, to suggest, or whatever?
Don't forget to leave your opinions in the comment section.