Social Icons

Thursday, March 12, 2015

This “Killer USB” Flash Drive Will Explode Your Computer

Forget USB 3.1 and USB Type-C, the USB I’m going to describe ahead, will burn down your computer if you insert it in the USB port.


The Killer USB

This story about making a USB flash drive into a bomb was described by a Russian researcher who took an interest in this concept and developed a USB killer pen drive which can burn your computer to ashes.
He says:
"The basic idea of the USB drive is quite simple. When we connect it up to the USB port, an inverting DC/DC converter runs and charges capacitors to -110V. When the voltage is reached, the DC/DC is switched off. At the same time, the filed transistor opens. It is used to apply the -110V to signal lines of the USB interface. When the voltage on capacitors increases to -7V, the transistor closes and the DC/DC starts. The loop runs till everything possible is broken down. Those familiar with the electronics have already guessed why we use negative voltage here. I‘ll explain to others that negative voltage is easier to commutate, as we need the N-channel field resistor, which, unlike the P-channel one, can have larger current for the same dimensions."
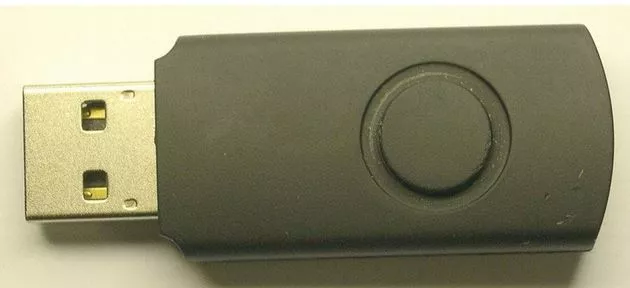
This researcher, nicknamed Dark Purple, works with an electronic company and he ordered some China manufactured circuit boards and created a USB killer device for himself.

killer-usb-explode-computer-laptops
After finishing, it looks like a regular USB

Talking about the danger involved, he says:
"Within a week, I have developed quite specific circuit implementation, ordered components. After a few months of waiting for them, I made a full-fledged prototype. I tested the idea and “burnt down” everything I could. I’m not going to talk to you about the application area, but a former colleague says that it’s like an atomic bomb: cool to have, but can not be applied."
The Hacker News writes that instances of hacking into the systems and increasing the temperature of a computer to make it burn has happened in the past.
Back in 2014, a security firm demonstrated the same in Apple’s Mac.

If such instances are possible, cyber criminals can surely turn a USB into a bomb and kill people.

So next time if you find a USB flash drive somewhere, what will you do? Throw it away or plug it in some USB port to check the contents?

Wednesday, March 11, 2015

Monitor TCP, UDP Communication in Windows with PortExpert

PortExpert is a free  application that can give very useful information about all TCP, UDP communications connected to the system and is hence useful to identify potential threats.
These days we are hearing of many hacking stories, where millions of computers are being compromised by malware. Monitoring TCP/UDP traffic can help a user protect their computer from active threats.
They can check all active connection those are trying to connect to internet or sending receiving packets.

PortExpert checks for open TCP or UDP ports that can be used by hackers to perform malicious activity on the system. A computer user must check for threats, virus or open ports, and they should run scans on a timely basis to detect and remove those threats from their computer.

Monitor TCP, UDP Communication on Windows with PortExpert

Monitor TCP, UDP Ports

When a user launches PortExpert, they will see list of all TCP or UDP ports which are active and connected with their remote IP address. A user can double-click on any such active connection to dig further and learn more about that connection. The Freeze Time option can be used further to deactivate any connection.
The whois, feature can be used to learn more about the IP address location. It will open whois.domaintools.com website when an IP address is selected from the pool of active connection. By clicking on Search Web feature, a user can learn more about the current process which is currently accessing internet using active TCP/UDP connection.
The Show System Process, is another option using this user can check current active ports used by OS files. Show Local Connection will open current active UDP port connection and a user can select any such running process and read the basic information about the process ID and the Protocol (TCP, UDP) it is using to connect, local address and remote address with port number.

netstat command

Users can also check active connection using Windows in-built command line. To see all active network connection, open a command prompt window, type netstat and hit Enter. This command will show you the active TCP connections and ports with the physical computer name. Type netstat /? to list down all commands along with the task description.
Using netstat -n command will show TCP connections and ports with numerical or IP address instead of computers or services actual name. netstat -a and netstat -b are other few commands that can help user to check various active connections.

PortExpert free download

Go get it from it  home page.
Remember to download the Lite installer or the Portable version as otherwise you may be offered bundled software.

Enable, Disable Command Prompt using GPO or Windows Registry

To prevent access to the Command Prompt in Window, you can make use of Group Policy settings or edit the Windows Registry, so as to disable the Command Prompt. When you do this, it will prevent users from running the interactive command prompt or CMD.exe. Let us see how we can do it in Windows 8 / 7.

Disable Command Prompt

Using GPO

Disable Command Prompt

Open Run box, type gpedit.msc and hit Enter to open the Local Group Policy Editor. Navigate to the following path:
User Configuration/Administrative Templates/System
In the right side pane you will see Prevent access to the command prompt. Double click on it to set the policy. Select Enabled and click Apply/OK.
This policy setting prevents users from running the interactive command prompt, Cmd.exe.  This policy setting also determines whether batch files (.cmd and .bat) can run on the computer. If you enable this policy setting and the user tries to open a command window, the system displays a message explaining that a setting prevents the action. If you disable this policy setting or do not configure it, users can run Cmd.exe and batch files normally.
Here, you can also Disable the command prompt script processing also, if you wish.
If your version of Windows does not have Group Policy, you can do the following.

Using Registry
Run regedit to open the Registry Editor. navigate to the following registry key:
HKEY_CURRENT_USER\Software\Policies\Microsoft\Windows\System
If the Windows or System key is not present, you may be required to create them.
In the right pane, double click DisableCMD and set its value to 0.
If DisableCMD is not present on your system, you may be required to create a new DWORD value, name it DisableCMD and then give it a value 0.
Now if any user were to try to open CMD, they would see a message:

The command prompt has been disabled by your administrator.

Enable CMD

If for some reason, you need to do the reverse, ie. enable the command prompt, simply disable the Prevent access to the command prompt policy setting. In the registry, you may delete the DisableCMD DWORD or set its value to 1.

Hope this helps!

How to use Windows Calculator to convert Decimal to Binary

You can use the built-in Calculator in Windows 8 / 7 to carry out Decimal to Binary conversions.
The Windows Calculator file, calc.exe is located in the System32 folder.
To open it, type calc.exe in the start search bar and hit Enter.

How to use Windows Calculator to convert Decimal to Binary

During the course of your working, at times, you may feel the need to convert a decimal digit into binary digit or concert a binary digit into a decimal number.

Use Windows Calculator to convert Decimal to Binary

The Windows Calculator can be operated in 4 modes – Standard, Scientific, Programmer & Statistics. To be able to use to use Windows Calculator to convert Decimal to Binary, you have to use the Programmer mode.
To change the mode, click on View and select Programmer.

You will see Hex (Hexadecimal), Dec (Decimal), Oct (Octal) and Bin (Binary) radio buttons. These are used for converting numbers between these numbering systems.
Ensure that Dec (Decimal) radio button is selected.
Now type your decimal number.
Next select the Bin (Binary) radio button. This will convert the digit from Decimal to Binary.
As an example I opted to convert 2015 into Binary, and the converted digit came to 11111011111.

Trust it works for you!

Multi-lingual spell checker for Windows

Get it Right Spell Checker: Multi-lingual spell checker for Windows

If you are a writer and using your Windows computer for writing, you might be using some spell checking software for sure. Spell Checking software reads through your write-up and flags the words that may not be spelled correctly. It compares each word in the document with the words in the dictionary.
There are many different spell checking softwares available and Get in Right spell checker from
SSuite Office is one of such stand-alone multi-lingual spell checker for Windows PC.
Get it Right is a lightweight software and lands on your Windows PC in just a couple of minutes. The program comes in a zipped file and you just need to extract and run on your system.

get it right spell checker

SSuite Office Get it Right multi-lingual spell checker for Windows

The program has a very simple and user-friendly interface. You just need to paste the word document in the blank window of ‘Get it Right Spell Checker’ and click on Start Checking. The software will scan the entire document and flag the words that are incorrect.
The software also suggests you the correct words for each flagged word in your document. It is featured with a large collection of dictionaries which include English, Afrikaans, Dutch, French, German, Italian, Portuguese and Spanish dictionaries.
Get it Right spell checker also allows you to edit, delete, export or import the dictionaries. Furthermore, you can also create your own dictionary for any particular language or subject.
It is optimized for multi-core processors and lets you verify the spelling of words easily and quickly.

Get it Right Spell Checker

Overall, Get it Right Spell Checker from SSuite Office is a simple and useful software for those who often use their computer for creating documents. Although, it is very similar to the most of the spell checker available online which flag and rectify only the typing errors and not the phonetic or logical errors.
You can download it here.

Fix: Cannot Auto Logon In Windows 8 / 7

Most of you have might have single user account on your Windows systems, which is the administrator account. Hence, many of you may prefer to have automatic logon enable, when you start your system, in order to avoid entering the password at each logon.
In that method, we have unchecked the Users must enter a user name and a password to use this computer option under User Accounts window. But it may happen that you may find the Users must enter a user name and a password to use this computer missing in User Accounts. If you face this issue, read on.

Enable Automatic Logon-1

If you’re using domain controlled system, this crucial option may be missing. In that case you need to ask the domain controller to uncheck that option from controlling machine. But if you’re on a non-domain system, and you are still missing the option, then this article will help you to enable automatic logon using registry manipulation.

Cannot Auto Logon in Windows

Making mistakes while manipulating registry could affect your system adversely. So be careful while editing registry entries and create a System Restore point before proceeding.
1. Press Windows Key + R combination, type put regedit in Run dialog box and hit Enter to open the Registry Editor.


 Fix: The attachment size exceeds the allowable limit In Outlook 2013

2. Navigate here:
HKEY_LOCAL_MACHINE\SOFTWARE\Microsoft\Windows NT\CurrentVersion\Winlogon
Enable Automatic Logon-2

3. In the right pane of above mentioned registry location, you need to make sure that following data exists. If something is missing, you can add it:
AutoAdminLogon  – Registry String (REG_SZ) –  Value data is 1.
DefaultPasswordRegistry String (REG_SZ) – Value data is your user account password.
DefaultUserNameRegistry String (REG_SZ) – Value data is your user account name.
Hence add the missing info if any, and once you’re done, close Registry Editor plus reboot. After restarting the machine, you should have auto-logon enabled.

Trust it helps!

Hide data in a secret text file compartment of Windows 8 / 7

The Windows operating system offers many tweaks and tricks. If you are aware of these, then you can complete your tasks quickly and in a simple way. You may never need to use any third-party software, if you are good at using those tricks. Among those many tweaks available, I will let you know, how to hide data in a secret text file compartment, created using a Notepad in Windows 8 / 7.

We normally save our bank account numbers, credit card numbers, important passwords and so on, in text files and place them on our desktop to access them easily.
 But, if your system is being shared with others, then there is chance of this information being compromised.
What I suggest is, follow this method of hiding data whenever necessary and remove those text files immediately once you are done with your work, as once anything is made, there are many ways to break it. This method makes use of the Alternate Data Streams of the NTFS file system, which Windows supports.

Hide data in a secret text file compartment

First open the command prompt in your Windows system and type the following command:
Syntax:
notepad FileName.txt:SecretWord.txt
Example Command:
notepad HideData.txt:FirstSecret.txt
hide data in a secret text file compartment

Now, when you hit Enter, it says Cannot find the file specified at the location and asks whether to create or not. Just click ‘Yes’. Start typing into the file and save it.

Enter Data to be hidden in a text file of Windows 7

The file shows a 0 KB size and it means there is nothing in that file.

File with hidden data is of zero KB Size

So, the text which we wrote, is hidden in this file and if you double click the file to open it, you see nothing written in it. Even if someone opens it, they will see an empty text file, and can start typing data in to it. It does not affect our hidden data at all.

Double click to open text file

See and Edit the hidden data which was saved before
Now, if you want to see the hidden data, you need type the same command. You can even add some more data in this step itself.

Edit the hidden data from the command prompt of Windows 7

If you want to add some more hidden data to the same file, then you need to use another secret word. This is not at all related to the data hidden with the first secret word.

Enter new hidden data in a text file of Windows 7

Example Command:
notepad HideData.txt:SecondSecret.txt
None of them will have impact on either files or the main data. One thing to remember is, you need to go through command prompt to access the hidden data.

Now, when everything is done remove that text file completely using Shift+DEL and no one knows about that file any more.

This is a simple way to natively hide data in a text file of Windows. Use this tips whenever you need to save some confidential information for that span of time.

Remote Mouse: Convert mobile phone into mouse and keyboard

If we want to stop a video or want to move to the next slide, which may be running on our Windows desktop, then we need to go to the desktop to do so manually. Have you ever thought of doing these tasks by just sitting at your place? Using Remote Mouse you can use your mobile phone or tablet as a set of mouse and keyboard to operate your computer. You need to install this app on your mobile and the software on your Desktop.

Remote Mouse review

There are many apps to control your computer remotely, but Remote Mouse has some additional features which makes it acceptable to  everyone. To begin using it, first you need to set it up in both, on you mobile phone as well as your computer.
Here are the steps:
Set Remote Mouse in both mobile and desktop and connect them remotely
First visit your Phone’s Store to install the Remote Mouse app in your device. It supports Windows Phone, Android as well as iPhone.
Next, visit the website of Remote Mouse and install the software on your Windows PC. As of now, you can download and install it for Windows 8, 7, Vista and XP.  Now, open it in your computer and mobile.
In order to connect your computer and mobile, both the devices should be in the same Wi-Fi network.

Control your computer remotely through IP Address

Now, you can connect the mobile to your computer through the IP Address or QR Scan, which are shown on the desktop, once you open the Remote Mouse on your computer.

Connect Remote Mouse with IP Address

Enter that IP Address or QR Scan Code and your mobile and computer got connected.
These are the 3 simple steps to set it up and connect mobile and computer. Now, everything is ready and you will be able to control your computer remotely, using the mobile or tablet, as mouse and keyboard.

Convert mobile phone or tablet into mouse and keyboard

There are many features in Remote Mouse. Apart from using it as mouse and keyboard, you can control playing videos, presentations and many more. We will look at them individually.

1] Using your mobile as mouse
After connecting your mobile with your computer remotely, you can use it as mouse by just tapping on the screen. There are some gestures to be followed to use left click, right click, scroll and drag. Here they are,
Left click = Single tap on the screen.
Right Click = Tap the screen with both the fingers.
Scroll = Move two fingers on the screen up and down to perform scroll from top to bottom.

Remote Mouse

You can even get the buttons and scroll which you see on the mouse on your mobile screen, by just enabling the Mouse option in Panels section which can be accessed through menu.
2] Using your mobile as Keyboard
Just tap on the keyboard icon and start typing it. You can see the text on mobile screen and computer. If you do not want the text to be displayed on the mobile screen, then you can toggle the Show Input Text option in Settings.

Use mobile as keyboard with Remote Mouse

3] Open Applications of your desktop through mobile
Remote Mouse also provides you the feature of accessing applications present in computer. Just tap on the respective icon and it lists down all the applications available in your computer. You can open Notepad, word document, audio/video player, folders and many more.

Use Remote Mouse to access system applications

4] Shutdown or hibernate your PC through mobile
You can even Shutdown, Restart, Logoff your Windows PC through your mobile using Remote Mouse. You can even put your PC in sleep mode and controls are displayed by tapping the power icon in the Remote Mouse app.

Shut down PC from mobile using Remote Mouse
All these feature are of free of cost for both Android and iPhone users. If you want to use Spotify Remote, Media Control and Functional keyboard you need to pay separately for each of them.

5] Panels and Settings Sections
You can use Panels and Settings Sections from the Menu to toggle some options. You can show mouse keys, hid/show input text, enabling left hand mouse and more.

6] Air Mouse Mode
You can just shake the handheld device to move the mouse cursor on the desktop screen. In order to use this Air Mouse Mode, just press and hold the button on the screen of app and sway or shake mobile to move the cursor.
Use Air Mouse Mode in Remote Mouse

7] Set up a password for connection
You can even set up a password for connecting your mobile and computer remotely. For this, right click on the Remote Mouse icon (from quick launch) on desktop and click “Preferences”. Then tap on “Settings” tab and create password.

Set password for Remote Mouse

Now the next time, when you try to connect to computer, it asks for password. This is very important from a security point of view.
These are the things which you can do with Remote Mouse. This is really a good app to turn your mobile or tablet in to mouse and keyboard. You can control your PC right from your smart mobile. It is for free of cost and it very simple to set up and use.

Visit the home page and download Remote Mouse software for Windows. Get the app for your Windows Phone from the Windows Phone Store.
This tool is also available for Mac computers, Android Phones and iPhone.
You will be able to get the details on its home page.

Manage Users in Windows 8 / 7 with Quick User Manager

The Control Panel’s User Account applet, helps you manage your User Accounts. You can create a new User Account, change User Account name and do more. But it doesn’t help you much when you need to quickly perform operations like deactivating accounts, changing user benefits and addition of multiple users at once. If you want to manage your Users quickly, you can use Quick User Manager, a free portable software for Windows.

Manage Users in Windows 8 / 7

Quick User Manager

Quick User Manager enhances the use of your user accounts as you can manage multiple features together. You can see all the features on the home page itself, which also includes inbuilt Administrator or Guest accounts.

Manage Users in Windows 8

Using this freeare, you can change user account settings, create, disable, enable, remove user accounts, clear the lockout state, auto-logon a user, set picture to be associated with a user account, set or remove its password and more!
In the left section, click on any account you wish to modify. A detailed description will be automatically displayed in the right panel of the home screen which includes:
  1. User account name – This contains the account name which is saved in the Security Account Manager and cannot be changed.
  2. User display name – Display name is present on the user control panel, welcome screen and start menu. It can be edited by clicking on the text box.
  3. User privilege – This includes Guest, Standard user and Administrator option.
  4. The account is disabled- You can disable the selected administrator account. This option is not available for inbuilt and the current user accounts.
  5. The account is locked – This option is to check if your account is locked by any chance.
  6. Whether the user account password can be changed, is required or the password has an expiry.
  7. Whether the password is expired of the selected user account.
  8. Auto logon – Only single user account can be set to log on automatically.
  9. Remove user from the welcome screen- By selecting this user account will be removed from the welcome screen.
You can make all these changes with a click in the check boxes available. To apply and confirm these settings, press Save changes. Once you click, a successful pop up message box will show as the confirmation.

You can also change the user account picture by clicking on the Change picture button available on the interface itself. After selecting, a pop up will be displayed from where you can browse your favorite picture and set the new picture to centre, crop or stretch.

Quick User Manager

To manage your user accounts the Quick user manager lets you easily change the password. By pressing the Set password button it will show a box from where you can change the password by entering the current and new password. This application also lets you to create or delete new existing accounts.

Quick User Manager

To create multiple user accounts or modify existing accounts this program will be very helpful for you.

Quick User Manager free download

Click here to download and manage your user accounts easily and quickly.

How to hide a drive in Windows 8

If you are a Windows user, you would probably know about hiding or locking a folder or file which has confidential data. We generally, use some folder encryption software to do these tasks. But, if you have many such folders and files, it is not a good idea to lock each and every folder. A better option would be to move all such files and folders which you want to hide or do not want others to know about their existence, to some drive on your PC. Then, hide that entire drive so that it is not visible to anyone.
That hidden drive will not be seen in Windows File Explorer, but can be accessed through a Command Prompt or by typing the drive letter in the address bar of Explorer. So, when someone uses your Windows PC, they do not know that there is such a drive existing in your PC and your confidential data is safe. This can be done in Windows Vista, Windows 7 and Windows 8. I will guide you through steps to be followed in Windows 8.

Hide a drive in Windows 8

There are 4 ways to hide a drive in Windows 8. It is through Disk Management, using Group Policy, through Windows Registry or by using Diskpart command in CMD. We will see these ways step by step, so that you can implement the same to hide a drive in Windows 8.

Hide Drive using Disk Management

If you want to hide a drive in Windows 8 through Disk Management, you need to right-click on My Computer and then click Manage.
In Computer Management Console open Storage by double clicking on it.

Hide a drive in Windows 8_storage

Now, double-click on Disk Management Snap-in.

Hide a drive in Window 8_Disk Management

 Disk Management Console opens up and you can see all drives of your PC.

Hide a drive in Windows 8_change the drive letter


Choose the drive which you want to hide and right click on it. Choose ‘Change Letter and Paths’ and click on Remove button.


Hide a drive in Windows  8_click remove

If it asks for confirmation, say ‘Yes’. Now, you cannot see the hidden drive in My Computer.

Hide drive using Group Policy

Run gpedit.msc and navigate to the following settings:
User Configuration/Administrative Templates/Windows Components/File Explorer
Double click Hide these specified drives in My Computer and select Enabled.

Hide a drive in Windows 8

From the drop-down menu, select the Drive you want to hide.
This policy setting allows you to hide these specified drives in My Computer. This policy setting allows you to remove the icons representing selected hard drives from My Computer and File Explorer. Also, the drive letters representing the selected drives do not appear in the standard Open dialog box. If you enable this policy setting, select a drive or combination of drives in the drop-down list. This policy setting removes the drive icons. Users can still gain access to drive contents by using other methods, such as by typing the path to a directory on the drive in the Map Network Drive dialog box, in the Run dialog box, or in a command window. Also, this policy setting does not prevent users from using programs to access these drives or their contents. And, it does not prevent users from using the Disk Management snap-in to view and change drive characteristics. If you disable or do not configure this policy setting, all drives are displayed, or select the “Do not restrict drives” option in the drop-down list.
Save and exit.

Hide Drive using Windows Registry

In this second way, we will use NoDrives registry key to hide a drive in Windows 8. As we add a key to the registry, I suggest you to take the backup of your registry. Once it is done, proceed!
Press Windows Key+ R, type ‘regedit’ and hit enter. It asks for confirmation, say ‘yes’. Now, registry Editor Console opens up. Navigate to the below path,
HKEY_LOCAL_MACHINE –> Software –> Microsoft –> Windows –> CurrentVersion ->Explorer
Here we are going to create a new DWORD value, so right click on Explorer and choose New -> DWORD Value (32-bit).

Hide a drive in Windows 8_create DWORD

Give the name as ‘NoDrives’ and double click on it, to change the properties. Now, console opens where we need to enter values. In Value data, choose the one based on the drive you want to hide. Each drive letter has unique value and values are as below,
A: 1, B: 2, C: 4, D: 8, E: 16, F: 32, G: 64, H: 128, I: 256, J: 512, K: 1024, L: 2048, M: 4096, N: 8192, O: 16384, P: 32768, Q: 65536, R: 131072, S: 262144, T: 524288, U: 1048576, V: 2097152, W: 4194304, X: 8388608, Y: 16777216, Z: 33554432, All: 67108863
Choose the corresponding value for the drive and enter that value in ‘Value data’. Choose ‘Decimal’ for Base section. As I want to hide, drive ‘G’, I am entering the value as ‘64’.

hide a drive in Windows 8_edit DWORD

If you want to hide two drives, say for example ‘E’ and ‘G’, you can enter value one value as ’80’ (E = 16 and G = 64) and it hides both the drives.
Restart your computer and your drive in hidden now. If you are supposed to get the drive back, change the value to Zero or you can even delete the ‘NoDrives’ registry key.

Hide Drive using CMD

1] Open an elevated command prompt, type Diskpart and hit Enter.
2] Type List Volume and hit Enter.
3] Now type select and the numeral against the letter of the Drive (eg. it could be G Drive), which you want to hide. For instance, it could be Select Volume 6. Hit Enter.
4] Finally, type Remove Letter G and hit Enter.
You will see a message – Diskpart successfully removed the drive letter or mount point.
To show the hidden drive, follow steps 1, 2, 3 mentioned above.
Now type Assign Letter D and hit Enter. This will show the drive in Explorer.

These are the 4 ways you can hide a drive natively, in Windows.
UPDATE: You can also use freeware HideCalc to hide disk drive in Windows.

Windows 8 Safety Settings

With the increasing influence of the Internet in our lives, online safety and privacy is becoming a very important topic to ponder upon. It is essential to maintain the privacy online, especially when we are sharing so much of our personal data on the web.
Thankfully, Windows 8 comes with some brilliant safety and privacy options to secure Windows, that help protect us from the online threats and risks. With Windows 8 safety and privacy tools, you can protect your online privacy as well as the safety of your children online.

Windows 8 Safety Settings

1] Privacy Settings
Go to the PC Settings from the ‘Charms Bar’. You can open the Charms Bar by taking your pointer to the right edge of the screen or by pressing the shortcut keys Win+C.

windows 8 privacy settings

Go to the ‘Privacy’ section and control if the apps can use your location, name, and picture.

2] Family Safety
The Family Safety feature of Windows 8 allows you to get the reports of all the activities done by your kids on your PC. Furthermore, you can set the time limits for them to be online, apply restrictions for certain apps and much more.

Windows 8 Safety Settings
To apply the Family Safety to your child or anyone in the family, you first need to create an account for them.
Go to the control panelàUser Account and Family SafetyàSet up Family Safety for Any Users.
While creating a new account for a new user, check in the box to turn the family safety on. Checking this check box will start monitoring the account automatically.

Windows 8 privacy settings 2

You can now adjust the settings accordingly. Set the time limits, web filtering, apps and games used etc. You can also restrict some particular websites, apps and games for this new user from the Family Safety settings.

famely safety settings Win 8
You can also view the detailed activity reports of the new user, right from the websites he/she visited, pages blocked, games played and the time spent on the PC.

3] Protect Your PC from Malware
Microsoft has always been very particular about the protection against malware. Windows 8 comes with some very good technologies which defend your PC against such malicious software and hacking attempts. Features like Windows Firewall, Windows Defender, and Windows SmartScreen make your PC safer and more secure.
Windows Firewall is turned on by default. Microsoft suggests not to turn the Firewall Off even for a few minutes as it may expose your computer system to malware – unless of course, you are using a third-party firewall software.
Windows Defender: It is recommended to keep Windows Defender ON as it guards your computer against any malware, spyware or viruses spread online. It is not turned by default and you have to adjust the settings manually.
If the Windows Defender in your PC is off, you might see a message showing that Defender is turned off and isn’t protecting your computer.
To adjust the settings go to the Action Center. Press Win+C and open the Charms Bar and search for Action Center. After you turn it ON, Windows Defender runs automatically in background and alert you if any malware attempt to install on your system. It uses red, yellow and green colors to show the security status of your computer. Furthermore, it also lets you scanning your system to check if any malware has landed to your PC. You can remove the threats detected in the scan.
You may also use a free third-party antivirus software or an Internet Security Suite, if you wish.

Windows SmartScreen
windows smartscreen

This is the new safety feature added to Windows 8 which protects your computer from any kind of spyware. Microsoft has its own database of apps and Windows SmartScreen, if turned ON, won’t allow you to download any app until its reputation is verified. You can adjust the SmartScreen settings from the Action Center.
If your personal data is shared with the social networking websites and the online vendors, it becomes very important to understand the importance of online privacy and adjust the safety settings accordingly.

Stay safer!
Do share if you have any additional tips.

Windows 10 at the core of future Internet of Things?

While Microsoft pointed out many uses of Windows 10 at its Jan 21 2015 event, it missed out on Internet of Things. Or, at least, did not bring up the topic. It talked about desktop version of Windows 10, mobile version of Windows 10 and Windows 10 for Surface Hub and more but did not drop a hint that it is bringing Windows 10 into the realm of Internet of Things. The article tries to decode how the future of Internet of Things can change with Windows 10 at its core.

windows-devices-yellow

Windows 10 for Internet of Things

In the recent developments, the most important are availability of Windows 10 for a range of devices and the upgraded version of Raspberry Pi. There have been more developments but they are out of scope of this article. We focus on Windows 10 for Internet of Things in this post.

Though they did not mention it specially, the way Microsoft presented Windows 10 at the Jan 21 2015 event, they did drop many hints about having an edition of Microsoft Windows 10 for Internet of Things. One such hint was Surface Hub, which is nothing but a screen in effect but runs on Windows 10. The Holographic glasses will also run on Windows 10. Microsoft has come up with a micro version of .Net framework. All these are ample to suggest that there will be a version of Windows 10 for Internet of Things. And the doubts are cleared with new version of Raspberry supporting Windows 10.

More Coding Options As Windows Does All Essential Work
If Microsoft is offering a custom version of Windows 10, that I believe is named “Windows 10 Athens“, for micro systems and for Single computer boards such as Raspberry PI 2, there is a great scope of people using Windows 10 to build all the small things that will be connected to the Internet. Right now, people are using Linux for IoT (Internet of Things) and most of them code in Python and C++. Both these languages, once into executable form, will not be a problem for running on Windows 10. Every programmer knows that coding in C++ and Python is better and provides total control over hardware. So far, they had to come up with codes that would make the most of the hardware and deal with the compatibility of the operating system running these custom programs. They had to code for proper usage of hardware so that no part of the hardware was clogged and left unavailable for programs.
Notwithstanding the fact that programmers have better control over the hardware required for Internet of Things, the Windows 10 operating system will let them program more easily using more languages. Thus, more people will enter into creating and maintaining Internet of Things. Windows 10 is not about graphics user interface. Even Linux provides one but is bulky compared to Win10. The better part is that it is trimmed down just to suit the single computer boards such as Raspberry Pi 2 and does not waste resources unlike other operating systems. Programmers can now code without having to worry about handling memory properly, for instance. Windows 10 itself handles RAM in way that no part of memory is blocked and is easily available to programs on the IoT things. Likewise, the operating system runs easily on ARM-based processors and handles micro x86 chips easily.

Security of Internet of Things: Micro .NET and Win10 Internal Security
With Microsoft developing a micro version of .NET, security will increase with Windows 10 for Internet of Things. As of now, people do not even care to change their default passwords on things connected to the Internet. The ovens, lighting systems etc come with default passwords such as “passwords”, “1234” or “0000” and end users do not even know that they have to change the password to make themselves safer. All these while, any hacker can take control of these connected devices and use them to initiate a DDoS attack on any website. Since the things of Internet of Things are distributed throughout the globe, it is hard to charge anyone with hacking.

With Windows 10 coming into the picture, along with, the enhanced Micro .NET (that’s what I will call it until it has a formal name announced) things will change as the operating system has focused on security that will be much better than other operating systems in the market as of now. It will be harder for hackers to break into things of Internet of Things.

While Microsoft has been building its own Internet of Things and they stress on security, the other programmers creating their own Internet of Things can now use a lightweight graphical interface to prompt and let the users change the passwords easily.

Windows 10 For IoT: Summary
The future of IoT looks more promising and focuses on the security of connected devices. Windows 10 promises better Internet of Things with one of its edition focusing solely on the functioning and security of the devices used in all households.

To sum up in one line, Windows 10 is all set up to build up a major portion of Internet of Things with its new Windows 10 Operating System and the micro .NET framework as people will prefer the combination for simple UI and enhanced security features.

T-Rex Dinosaur game in Chrome

Enjoy built-in T-Rex Dinosaur game in Chrome browser when offline

Google Chrome web browser includes an Easter egg of sorts. It lets you play a game when you are not connected to the Internet. Today, we will see how we can enjoy the built-in T-Rex Dinosaur game in Chrome browser when offline.

chrome t-rex game

When you are not connected to the Internet and you try to visit a website, you will see the above Network Error page, displaying the message – Unable to connect to the Internet.
If you see a cached page, just refresh the page. Hard Reload, if need be, and you will see this page.
Have you ever wondered what the baby Tyrannosaurus Rex or T-Rex Dinosaur was doing there? Well, he is there waiting for you to play with him!

Chrome’s T-Rex Dinosaur game

To start the game, just press the space-bar. T-Rex will start running. An endless stretch of land will appear in front of him, and you will have to avoid the cactus plants which appear in his path. In real life he would probably trample over them, but here you will have to jump over it.
To jump over the obstacle, press the space bar again. If you fail to jump over, the game stops and you will be offered a restart.

chrome-dino-fame

Enjoy playing this endless runner game in Chrome and let us know how much you scored in the first attempt!

Use Google Drive to convert Images to Text (OCR)

We may come across the need to convert images to text which should be editable, or we may need to convert some scanned copy into text, so that it can be edited in our regular editors. Actually, converting the scanned copy to text is done using Optical Character Recognition (OCR) Software which may not come free. You need to spend some good amount of money to get them and convert images to text. Spending money to buy those OCR software only for single usage is not a good idea. You can convert images to text for free if you are a Google Drive user. Google Drive provides you the OCR technology and we make use of it to convert images to text.

Convert Image to Text using Google Drive

Before converting images to text, you need to see that there should be at least some text on the image, so that it can be converted to editable text. Images can be of png, jpg or any other format. Not only images, you can even use Google Drive to convert PDF files to text for free. Let us see steps which we need to follow to convert images to text and the same is applicable to convert PDF files to text.
Visit the Google Drive website and log in to it. If you do not have an account, it is advised to create and one and then log in to it.
Click on the New button and select File Upload to upload images file which you want to convert to text. Select the particular image file and it gets uploaded to Google Drive. In this example, I uploaded the screenshot of part of my article.
Convert images to text_upload file

Once the files gets uploaded, right click on the image file and move towards Open with >> Google Docs.

Convert Image to Text using Google Drive

Now, new tab opens with the image surrounded by the blue border and the corresponding editable text at the bottom. You can resize the blue border, based on the content which you want.
Make sure you got the text as you want. You can use options like In line text, Wrap text and Break text. Follow the process and be confident that you go the right text. You see that the text is editable.

Convert images to text_check the text

Once you are sure about the conversion, remove the image from the tab, save the remaining text and close the tab. You can see the Google Document with the converted text next to the image file. Now, your image got converted to text and you can remove that image file as it is no more needed.


Convert images to text using Google Drive

Once you are done with the conversion, you can edit it in toe Google Drive or you can download to your local PC and edit it in your editor.

Points to be remembered
  • If your image file has less text to convert, then there might be little number of mistakes in the converted file. Make sure that you made the changes as your need before saving the converted document.
  • If only certain part of the section is to be converted to text, then I suggest you to crop that part of the image and then convert it in to text, to reduce mistakes in the conversion.
  • Images that need to be converted to text should be below 2 MB in size.
  • For PDF Files only first 10 pages are converted to text. So, if you have bulk of PDF files to be converted to text, then follow the process for every 10 pages, but not all at once.
This is the best and easy way to convert images to text for free. If you have anything to add, please do share with us through comments.

What does Zero Day attack, vulnerability or exploit mean

We often hear of Zero Day attacks, vulnerabilities or exploits. We have also heard of Zero Day patches. This article helps you know what is a Zero Day attack, exploit, or vulnerability. Zero Day attacks generally refer to attacks on vulnerabilities, where there is a zero day gap between the found vulnerability, and the attack taking place.

Zero Day attacks


zero-day-attack

A Zero-day vulnerability is a hole in software, firmware or hardware that is not yet known to the user, vendor or developer, and is exploited by hackers, before a patch for it is issued. Such attacks are called Zero-day exploits. Thus a Zero Day attack is an exploit done before the developer of the software or the manufacturer of the hardware can patch the Zero Day Vulnerability. Thus, the “vulnerability” is waiting for a patch or vendor fix, while the “attack” to exploit the vulnerability takes place.
There can be many types of Zero-Day Attacks. This includes attacking a system to gain access on it, injecting a malware, spyware, or adware. This attack is done before the manufacturer is even aware of the vulnerability and hence there is a sense of emergency to patch it up.
Once the patch is made available, the vulnerability is no longer a “Zero Day vulnerability”.
A Zero Day vulnerability is usually detected either by hackers or by some third-party security firm. In case of hackers, they make good use of vulnerability until it is fixed. In case a third party security firm discovers a Zero Day Flaw or a Zero Day Vulnerability, they inform the manufacturers of the software or hardware system so that they can rush to work on a fix, usually known as a Zero Day patch, and give it some time to patch it.

How Microsoft deals with Vulnerabilities

Normally, there is a Patch Tuesday at Microsoft.Microsoft uses various terms to describe the software updates and patches released by it. On every second Tuesday of a month, Microsoft releases a set of patches or fixes that apply to its range of products, including the Windows operating system. The patches are normally for vulnerabilities or problems found in case of routine software life cycle maintenance.
A Security Update is a widely released fix for a product-specific, security-related vulnerability. Security vulnerabilities are rated based on their severity. The severity rating is indicated in the Microsoft security bulletin as critical, important, moderate, or low.
Then there are Critical releases of patches that come out of the turn. If there is something very critical and cannot wait for next Patch Tuesday, Microsoft issues a Security Advisory along with a patch, which is usually aimed at patching up Zero Day vulnerabilities, referred by third party security firms.
Sometimes, there are other types of critical vulnerabilities that are found while auditing a software and which need immediate attention. Microsoft will issue an Advisory in such cases too, but this cannot be technically categorized as Zero Day as it is Zero Day Vulnerability only if the manufacturer is not aware of the vulnerability, until informed by some third party – hackers or third party security firms.

How to deal with Zero Day Attacks & Vulnerabilities

You cannot do much in case of Zero Day Vulnerability, except to wait for a patch issued by the manufacturer of software or hardware in question. You may have noticed that zero-day vulnerabilities are often found in software like Adobe Flash and Java. Once the patch is released and you are informed, get the patch applied as soon as possible.
It also helps to keep things such as operating systems, installed software and browsers updated. In most cases, there are popular programs like browsers and operating systems that are scanned for Zero Day vulnerabilities and misused by the cyber criminals. Though not full protection, you are somewhat protected if your software and firmware (hardware) is up to date with all the updates released for the products – at least you won’t be exploited via known vulnerabilities if you are up to date.

How to uninstall and remove Superfish malware completely

The Superfish malware has been in news recently, with Lenovo pre-installing it on all their new computers. This post shows how to find out if your Lenovo computer has Superfish malware installed and offers instructions on how to uninstall it and remove it completely.

The Superfish malware replaces the advertisements on the website which the user visits, and replaces them with new advertisements which possibly benefit Lenovo and Superfish.
This raises security concerns, since, when it intercepts HTTPS encrypted webpage to replace its own ads, it creates a mix of secure and insecure content, laying open the path for other hackers to potentially carry out its own attacks.
If you bought a Lenovo laptop recently, you may want to first check if you have Superfish malware installed on it. If you find out that you do, then here are the steps you need to take to completely remove it from your computer.
After issuing a statement and expressing regret about it, Lenovo has posted instructions on how to go about uninstalling the malware completely.

Remove Superfish malware completely

1] Open Control Panel > Program and Features.

remove Superfish malware

Here you will see an entry Superfish Inc. VisualDiscovery. Select it and click on Uninstall. Once the uninstallation in completed, restart your computer.
2] Now open a command prompt windows and type certmgr.msc and hit Enter, to open the Certificate Manager.

certmgr-superfish

Certificates are digital documents used to manage network authentication and the exchange of information. The Certificate Manager or Certmgr.msc in Windows lets you see details about your certificates, export, import, modify, delete or request new certificates.
3] Under Certificates – Local Computer, expand Trusted Root Certification Authorities. You will see Certificates. Select it.

uninstall Superfish malware

Now in the right side, you will see Superfish, Inc. Right-click on it and select Delete.
4] Windows will prompt you to confirm deletion. Click Yes and restart your device.

5] If you use Firefox browser, there is one more step you will have to carry out. Open Firefox Options > Advanced > Certificates > View Certificates. If you see a listing for Superfish, click on it and select Delete.


firefox-certificates

6] Finally to be doubly safe, run a full-scan of your antivirus software and restart your computer. Incidentally, Microsoft has updated Windows Defender. It now removes Superfish along with the root CA certificate.
You will have now completely removed Superfish malware from your computer.

UPDATE: Lenovo has released SuperFish Removal Tool, which makes its removal, a matter of a click.

Stay safe!